Perfecting the Project Display Board
The project display board for a science project may be the last step before the fair, but don't underestimate its importance. Your display board may be one of hundreds on display. You want to make sure it summarizes your project and invites a viewer to stop and take a minute to learn more about your project, research, and conclusions.
Creating a successful project display board takes time, but it's an important step! Our tips, tricks, and techniques help guide you through the process.
The End is in Sight
Some students really enjoy the visual aspect of creating a display board. But for others, the project display board is not the most fun part of the science project process. It's certainly not the same as experimenting in the lab or testing electronics or physics projects in the garage. But the biggest factor working against the project display board for some students is that its construction mostly takes place at the end of the process. There's been hard work and testing involved, maybe spanning many days or weeks. Students may want to be "done" with the process, and yet there is one more step. It's a final step, but it's an extremely important step. When a student creates a project display board, she is putting together a visual representation of her entire project to share with an audience.
Highlighting Hard Work
One thing students should keep in mind is that a stunning and scientifically sound project, even a breakthrough one, needs to be supported by a compelling project display board. The "full package" mentality counts.
It makes sense, right? The display board is the first impression of your project that attendees will see. It is the chance they get to, in a nutshell, understand what question you asked, what hypothesis you proposed, and how things turned out. If they're captured by the combination of the board and the science it conveys, they might stop to ask questions, learn more, and further evaluate what you've done. They might notice you and your project. If the board lacks the design savvy necessary to garner that attention, you may find that you've lost out, in the end, simply because you didn't do the project and its results visual justice.
Sandra Slutz, Lead Staff Scientist at Science Buddies, has frequently served as a judge at local and national science fairs, including ISEF. She agrees that a poor board can spell disaster. "The whole point of a display board is to showcase your project," says Slutz. "The goal is to communicate clearly, efficiently, and precisely what you wanted to investigate, how you investigated it, what your results were, and your interpretation of those results. You can have the cleverest, interesting, and important research, but if you fail to communicate that because your board is incomplete, poorly organized, or hard to read, then you won't walk away with the first place prize."
With the importance of the project display board so clear, why do so many boards fall short of the mark? Many factors come into play. For some students, there's a lack of understanding about what makes a display board effective. For others, there's a lack of time. Whether they wait too late in the process to begin the board, or whether they simply fail to put in enough time to do a good job, rushing the process and cutting corners rarely results in a winning board.
Better Display Boards
Science Buddies has a full section of Project Display Board resources, suggestions, tips, tricks, and examples. Before you create your display board, you should review all of these pages so that you have a good idea of what you want to accomplish with your board—and how best to approach the process. Every student can create a solid display board if they keep certain guidelines in mind:
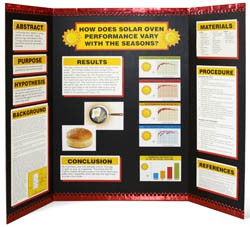
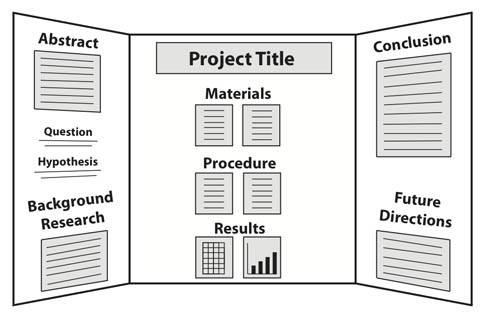
- Plan your board. Take time to mock up or "storyboard" your Project Display board on a sheet of paper before you start printing or gluing anything in place. This will help you best determine how to use your available space and how to size the elements you plan to include. Tip: Take time to review the sample layout shown below. Print a copy and make notes to indicate what information you'll include in each section. Make a list of elements you need to type up, or photos you need to print out.
- Know the size limitations. Most project display boards, like these from Elmer's, are 36" x 48". Oversized boards can be made by taking a modular approach and connecting more than one board, but keep in mind that you don't want your board too tall, too crowded, or with information too low to the ground to read. See Advanced Display Board Design and Tips for more information. Tip: Make sure you check your science fair guidelines for any specific limitations on size.
- Choose the right title. Your title should be accurate for your project but should be catchy enough, or interesting enough, to make a viewer curious. Your title should also be big enough to be seen from a good distance—and in a color type and font face that is easy to read and stands out on your board. Tip: spend time brainstorming for the best title for your project. Come up with a list of possibilities before you decide.
- Tell the whole story. Your board should contain all of the information required for a viewer to understand your project from start to finish. Our handy Project Display Checklist can help you keep track of what information should be on your board. Tip: print out a copy and check off each element as you put it in place.
- Make effective use of headlines and subheads. After a minute of looking at the board, the viewer should know what question you were researching, what you expected to happen, and how things turned out. In a short amount of time, the viewer will gather most of that information from headlines, photos, charts, and captions. The rest of the story is there, but pay attention to what someone can read by first reading all the headlines or subheads on the board. Test it yourself: JUST read the headlines and subheads on the draft of your board you've plotted on a sheet of paper or in your lab notebook. Include a summary of any photos. If necessary, take a blank sheet and job down the narrative you get by only reading those elements. Does the "summary" hold together?
- Know your font sizes. A project display board headline needs to be read almost across the room. Other elements of the board should be clearly readable at arm's length or even by someone walking by. If your text is too small, a viewer won't be able to easily take in the information—and might not even try. Be sure and understand the difference in font size for headlines and subheads versus the rest of the text. Use your sizes consistently to help guide viewers through the material. A board that is easy to read—both in terms of color balance and font selection—can immediately earn attention points. "A catchy title with lettering I can read easily from 20 feet away really piques my interest and can make me hurry over to learn more," says Slutz. Tip: review the Everything You Need to Know About Fonts for Display Boards resource.
- Remember the power of pictures. Photos and diagrams can quickly and efficiently convey information to a viewer—plus, they'll liven up your board! Just be sure to use relevant captions or subheads to further explain a photo's contents. And, don't put text on top of photos. It's hard to read! Tip: You want your board to be balanced. Use enough visual elements to help support and convey your information, but be careful not to make the board too cluttered.
- Use quality materials. From self-standing display boards to heavier papers and quality adhesives, gathering your materials before you start can make the project display board process a smoother experience. Tip: Our shopping list will help you determine what you need. We recommend keeping plenty of glue sticks on hand!
- Print your materials. Unless there is no alternative, don't hand-write elements for your display board. Use a word processing program to type up your information and headlines, and then print them out.
- Don't wait until the last minute. Creating a good project display board takes time. Not only do you need to map out how you want your information to appear, but you'll need to create your diagrams, charts, images, and text blocks and print them out (in the right sizes) to assemble on your board. Planning ahead is really important. Remember: There is more to creating a successful project display board than just gluing some hand-written pieces of paper in place!
Take Pride In Your Science Project By Taking Time with Your Display Board
Take care in creating your project display board! You worked hard on the project, and you want to share your results with others. To do so effectively, you'll have to draw them in. Reviewing our resources, planning ahead, and remembering that the final step in the process can be the make-or-break step, can help make the time you spend working on your project display board both efficient and effective.
In the end, there's a bit of a trick to the process... your board has to be good enough and well-designed enough that the board itself is not what stands out—the science does. Says Slutz, "People always want to know 'what is the best board you've seen?' The truth is, I have no idea. I can give you a long list of awful ones! Ones where I couldn't read the text because the font was too difficult to read, or the display was covered in so many extra decorations that I couldn't find the information I was looking for, or the board was so tall that half of the sections were above my head, and I couldn't see them. The truth is, the best display boards I forget about, and instead I remember something far more exciting to me—the scienceonthe board. And really, that's the whole point."
![]()
Elmer's Products Inc. is the official classroom sponsor of Science Buddies. For a full range of display boards and adhesives that can help as students get ready to showcase their science projects, visit Elmer's!
Categories:
You Might Also Enjoy These Related Posts:
- Spring Science Projects: 26 Science Experiments for Spring
- 6 Picks for St. Patrick's Day STEM
- Why Do Science Projects: Elevate Your Science Classroom: Taking Independent Student Science Projects to the Next Level
- Free science project support in the Ask an Expert forums
- Ahead of the Curve: A Science Teacher's Guide to Proactive Science Project Planning
- 2024 Rubber Band Car Engineering Challenge—10 Steps to Success
- Why Integrate Science Projects in the Classroom—A Teacher's Perspective
- 10 Reasons to Do the Rubber Band Car Engineering Challenge