Abstract
Does your home have any pet doors or gates for dogs, cats, or other animals? Some automatic pet doors can be set up to allow only certain animals through. These doors can help you control which pets are able to go outside alone or which ones have access to specific food, litter boxes, or toys. But why buy such a door when you can make one? In this project you will build your own automatic pet door that works with a magnetic collar tag. Exactly how you use it is up to you!
Summary
Previous experiencew ith Arduino is recommended. See our How to Use an Arduino page.
Electronic circuit parts required. See materials list for details.
For the safety of your pets, we recommend using small servo motors and cardboard doors for this project. Pets can be injured if a heavier door with a stronger motor closes on them accidentally. Adult supervision required for use of power tools.

Objective
Design and build an automatic pet door activated by a magnetic collar tag.
Introduction
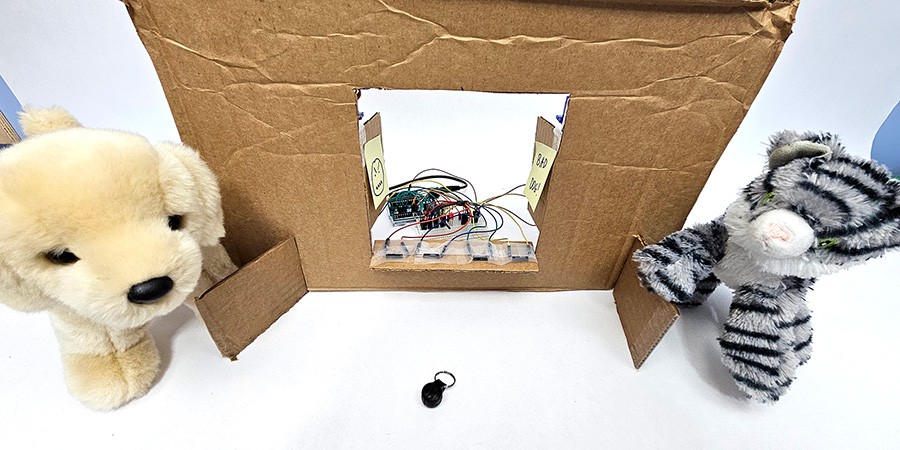
Cardboard door flaps open or close the opening. Sensors are taped to the bottom of the doorframe, with wires attaching them to an Arduino. Two stuffed animals, a puppy and a tiger, represent pets.
If you have an indoor/outdoor cat, you might have a cat door installed on one of the exterior doors of your house to let the cat in and out. If it is big enough for your cat, though, it could also let in wild animals like raccoons or squirrels! Or maybe you have multiple pets, and you have a system of baby gates set up to prevent them from eating each other's food or chewing on your belongings. That works until you forget to close a gate one day, only to come home and find your puppy eating cat litter!
Monitoring all these doors and gates can be a hassle, which is why some pet owners decide to buy automatic pet doors. These doors use an electronic sensor to detect which animal is nearby. Then, depending on how they are programmed, they may lock to prevent access or unlock to let the animal through.
Different types of automatic doors use different types of sensors. Some scan a microchip under the animal's skin. Each animal's microchip has a unique ID number. (This also helps animal shelters identify your pet if it ever gets lost and picked up as a stray, so make sure your pets are microchipped!) Others detect a radio-frequency identification (RFID) tag that must be attached to the pet's collar. Still others use a magnet sensor, like a reed switch or a Hall effect sensor, to detect a magnetic tag on the pet's collar.
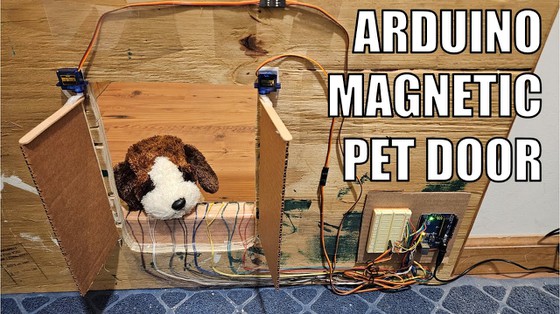
This project contains instructions to build an automatic door using reed switches, as shown in Figure 1. Reed switches line the bottom of the door's opening. Cardboard doors are opened and closed by servo motors, the blue objects at the top of each door in the picture. When a pet with a magnetic tag on its collar approaches the sensors, the doors either open or close, depending on how you have them programmed.
The door in Figure 1 was designed to give a cat access to a litter box room while preventing a small dog from getting in (and eating the poop—gross!), but what you do with your door will depend on your specific pet situation.
 Image Credit: Ben Finio, Science Buddies / Science Buddies
A home doorway is blocked by wood panels. A small rectangular hole big enough for a pet has been cut out of the barrier. Cardboard doors cover the hole or swing open to allow a pet to pass through. A small motor at the top of each door is connected by wires to a panel that includes an Arduino. Sensors at the bottom of the pet opening also connect with wires to the Arduino panel.
Figure 1. Reed switch–activated pet door with two servo motors.
You will need to know how to use servo motors and reed switches with an Arduino to do this project. Watch the following two videos to learn how.


Now get ready to design your own automatic pet door!
Terms and Concepts
- Sensor
- Microchip
- Radio-frequency identification (RFID)
- Reed switch
- Hall effect sensor
- Servo motor
Questions
- What are some of the reasons you might want an automatic door to allow or block access to a certain area for certain animals or pets?
- What are some different types of sensors that these doors use?
Bibliography
- Finio, B. (n.d.). How to Use an Arduino. Science Buddies. Retrieved February 6, 2024.
- Science Buddies Staff. (n.d.). Engineering Design Process. Science Buddies. Retrieved February 6, 2024.
Materials and Equipment 
Recommended Project Supplies

Note: This is an engineering design project. This materials list will help get you started, but the materials you need may be different, depending on how you design your door.
- Electronic parts and tools:
- Science Buddies Electronics Kit for Arduino, available from our partner Home Science Tools
- SG90 servo motors (2)
- Reed switches (Quantity depends on the width of your door, see Figure 1). Plastic-encased reed switches are less fragile than glass switches.
- Magnetic pet collar keys. This is one example—you can search online for different sizes.
- Additional wire. The jumper wires in the Science Buddies kit are intended to connect the breadboard to the Arduino, but not to connect other parts, like motors and sensors, that must be mounted farther away. You can buy rolls of 22 AWG hookup wire as well as extension cables for servo motors. The amount of wire you need will depend on the size of your door and where you plan to mount your Arduino.
- 10 kΩ resistor (1 per reed switch). The Science Buddies kit includes 5.
- Arduino-compatible wall adapter. Wall power is recommended for long-term Arduino use. With an adapter, you will not need to worry about replacing batteries or keeping your Arduino plugged into USB for power.
- Wire strippers
- Soldering iron and solder
- Heat-shrink tubing and heat gun, or electrical tape
- Materials and tools for building the door or frame
- Sheet of plywood
- Pencil
- Ruler
- Power drill
- Screws
- Jigsaw
- Popsicle sticks
- Wooden skewers
- Cardboard
- Eye hooks
- Hot glue gun
- Double-sided foam tape
- Eye protection
- Lab notebook
Disclaimer: Science Buddies participates in affiliate programs with Home Science Tools, Amazon.com, Carolina Biological, and Jameco Electronics. Proceeds from the affiliate programs help support Science Buddies, a 501(c)(3) public charity, and keep our resources free for everyone. Our top priority is student learning. If you have any comments (positive or negative) related to purchases you've made for science projects from recommendations on our site, please let us know. Write to us at scibuddy@sciencebuddies.org.
Experimental Procedure
- Plan out your full-sized pet door (if you plan to build one), but do not start cutting any wood yet. If you just want to make a demonstration for a science project and not a full-sized door, you can build a smaller working model out of cardboard (Figure 2). You may also wish to start out with a cardboard model to test your circuit and code before you build a full-sized door.
 Image Credit: Ben Finio, Science Buddies / Science Buddies
Cardboard door flaps open or close the opening. Sensors are taped to the bottom of the doorframe, with wires attaching them to an Arduino. Two stuffed animals, a puppy and a tiger, represent pets.
Figure 2. Cardboard model of a magnetic pet door.
- Assemble the test circuit as shown in Figure 3.
- Solder extension wires to your reed switches. Wrap the connections in either electrical tape or heat shrink tubing. Do not mount the reed switches to anything yet.
- Connect one end of each reed switch to an Arduino digital pin. In the diagram, the four reed switches are connected to Arduino pins 2, 3, 4, and 5.
- Connect the same end of each reed switch to ground with a 10 kΩ pull-down resistor.
- Connect the other end of each reed switch to 5 V.
- Connect an LED to Arduino pin 8, in series with a 220 Ω current-limiting resistor to ground.
- Connect each servo motor's ground (brown) wire to ground and power (red) wire to 5 V. Use extension cables as needed, but do not mount the servos to anything or build doors yet.
- Connect the servos' signal (orange) wires to Arduino pins 9 and 10, respectively.
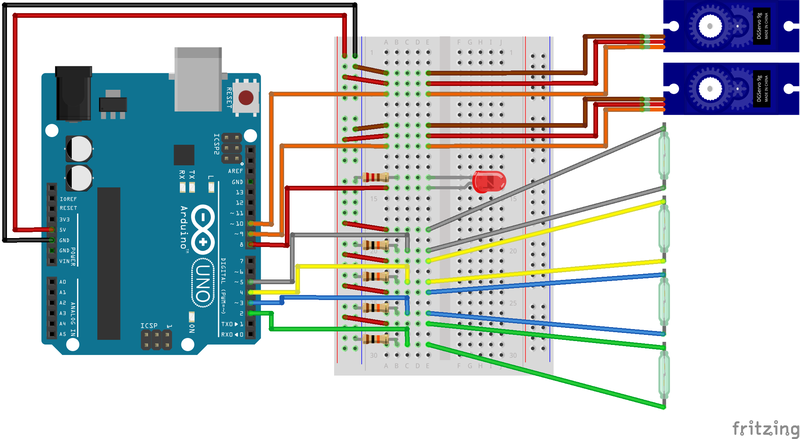 Image Credit: Ben Finio, Science Buddies / Science Buddies
Figure 3. Breadboard diagram for magnetic pet door.
- Download magnetic_pet_door.ino and upload it to your Arduino.
- Hold one of the magnetic collar tags near one of the reed switches. The LED should light up and the servo motors should move.
- Move the tag away. The servo motors should return to their original position.
- If the circuit does not work, double-check that all of your wiring matches Figure 3. The example code will not work properly if you use different Arduino pins.
- Once you have the example circuit working, it is time to start building your door and modifying the circuit and/or code to fit your needs. Remember that this is an engineering design project, so there is no single "correct" solution. Here are some things to consider:
- How wide is your door? How many reed switches do you need to cover the opening? The reed switches have a fairly short range (roughly a few centimeters). If the gaps between the switches are too large, a pet might be able to slip through undetected. If you add too many switches, however, you might start to run out of Arduino pins. You may need to experiment to determine the optimal number of reed switches and their orientation. (The switches in Figure 2 are all parallel to the door opening. What happens if you mount them perpendicular?)
- Where do you need to mount the reed switches so they are at the right height to detect the collar tags? In our design, we hot glued the switches to a second piece of scrap wood so we could easily adjust their height if needed. Do you have multiple pets of different heights that will use the door?
- Do you want your door to be closed by default or open by default? Our door is built and programmed to be open by default and to close when a pet with a magnetic collar tag approaches. Can you figure out how to reverse this behavior by changing the code?
- How will you build the physical doors? Our video shows one approach, using top-mounted servo motors to rotate doors made from popsicle sticks, cardboard, and wooden skewers, with metal eye hooks acting as a hinge at the bottom. But that is just one way to build a door. Remember that safety for your pet is a top priority. You do not want a pet to be injured by a heavy wooden door that closes on them accidentally.
- Cardboard doors (and all the electronics) are not waterproof, so our design is best used indoors. Additional effort would be required to weatherproof the door for indoor/outdoor use.
- Modify the circuit and code if needed—for example, to add more reed switches or change the servo behavior.
- Build your physical door. Important: Get an adult to help you use power tools.
- Cut a piece of plywood so it fits wherever you need to mount it—in an existing door frame, for example.
- Cut a hole in the plywood the size and shape you need for your pet(s).
- Build the pet doors, mount the servo motors on them, and attach them to your pet door frame.
- Carefully determine where to mount all the electronics and route the cables–you do not want a pet to trip and rip out all the wires! The design in Figure 1 uses a combination of clear packing tape and staples to hold the wires flat against the cardboard. Note: Be careful not to puncture the wires with staples.. You may need additional protection or covers if you have a pet that might try to chew or rip out the wires.
- Test your door by holding a magnetic collar tag up to it by hand. Make sure everything still works. Test each of the reed switches individually, one at a time. If an individual reed switch is not working or one of the servo motors stops moving, double check that none of the wires have come loose. Make sure all of the wires are secured with tape, staples, or zip ties as needed.
- Now it is time for some real-world testing! Put the magnetic collar tag on your pet's collar and observe how they use the door. You might need to set up a camera or lure your pet through with treats so you can see them use it. Does the door work properly? If it does not open or close like it is supposed to, you may need to adjust the location of your reed switches. Make adjustments and keep testing until you can get the door to work like it should.
- After you have it working, continue to monitor the door over time to assess its durability. Do the doors still open and close properly after a few days or weeks? Has anything come loose as a result of the repeated opening and closing? Have any of the wires been ripped out? If you plan to use the door long-term in your home, you will need to figure out how to make it more durable. Look online at commercially available pet doors and note how most of them have all of the sensitive parts (electronics, motors, etc.) encased in plastic. This is the case for nearly all consumer electronic devices. This helps protect the sensitive electronics inside from dust, spills, drops, and curious animals.
Ask an Expert
Variations
- Can you build a door using Hall effect sensors instead of reed switches? There are two types of Hall effect sensors: digital and analog. Test each type of sensor. Which one has the best range? Are there other advantages or disadvantages that would cause you to choose one type of sensor over another? Watch this video to learn more about Hall effect sensors and how to use them with an Arduino.
- Can you include an additional sensor, like an ultrasonic distance sensor, to detect whether a pet (or something else, like a person's arm) is already inside the door frame? You can use this as an added safety feature or override to prevent the doors from closing even if the reed switches detect a magnet. Safety features like this are required for doors that can close automatically. Other types of sensors are available, like the infrared beam-break sensors used on powered garage doors.

Careers
If you like this project, you might enjoy exploring these related careers:


Contact Us
If you have purchased a kit for this project from Science Buddies, we are pleased to answer your questions.In your email, please follow these instructions:
- What is your Science Buddies kit order number?
- Please describe how you need help as thoroughly as possible:
Examples
Good Question I'm trying to do Experimental Procedure step #5, "Scrape the insulation from the wire. . ." How do I know when I've scraped enough?
Good Question I'm at Experimental Procedure step #7, "Move the magnet back and forth . . ." and the LED is not lighting up.
Bad Question I don't understand the instructions. Help!
Good Question I am purchasing my materials. Can I substitute a 1N34 diode for the 1N25 diode called for in the material list?
Bad Question Can I use a different part?
Contact Us
Related Links
- Science Fair Project Guide
- Other Ideas Like This
- Electricity & Electronics Project Ideas
- My Favorites