Build an Automatic Dog (or Cat) Treat Dispenser
Abstract
Does your dog get bored when you are not home? Do you ever toss them a few treats right before you head out the door? What if you could keep them busy by automatically dispensing treats throughout the day? What about training them to sit in a certain place or even press a button by automatically rewarding them with treats? In this project you will build your own automatic dog (or cat, or other pet) treat dispenser that you can customize to react to different sensors.
Summary
Previous experience with Arduino is required to do this project. See our How to Use an Arduino tutorial page if you are new to Arduino.
A kit is available from our partner Home Science Tools. See the Materials section for details.
The dispenser design in this project is not pet-proof. Do not leave it on the floor unsupervised where your pet might chew through the materials to get to the treats inside.

Note: If you have never used an Arduino before, please do at least the first six tutorials on our How to Use an Arduino page before attempting this project.
Objective
Build and customize an automatic treat dispenser for a dog or other pet.
Introduction
Does your dog get bored during the day while you are at school? Do you ever have to feed your dog dinner late because you had an afterschool sports practice or club and got home late? Do you wish there was a way to automatically feed your dog (or other pet) when you were not home? If you search online you can find a variety of automatic treat dispensers. Some of them work on basic timers and others connect to a smartphone so you can control them remotely. Some even react to a button press or an electronic sensor that can detect when a pet is nearby.
In this project you will build an automatic treat dispenser like the one in Figure 1. The dispenser has a mechanical hopper, or rotating set of compartments made from popsicle sticks. A servo motor rotates the hopper so that one compartment at at time moves over a hole, allowing treats to slide down a ramp. The servo motor's motion is controlled by an Arduino. You can use a real-time clock (RTC) with an Arduino to keep track of the time and dispense treats at certain times of day. You can also use sensors like a passive infrared (PIR) sensor, which detects motion using body heat, or an ultrasonic distance sensor, which measures distance using ultrasonic sound waves. You can find tutorials for real-time clocks and many different types of sensors on our How to Use an Arduino page. Exactly how you customize your treat dispenser is up to you!
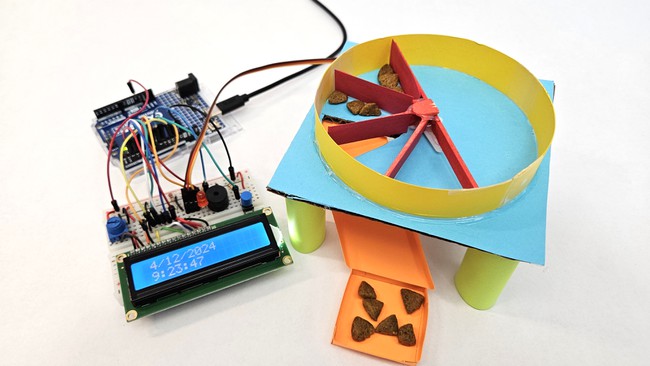 Image Credit: Ben Finio
Terms and Concepts
- Sensor
- Hopper
- Servo motor
- Arduino
- Real-time clock (RTC)
- Passive infrared (PIR) sensor
- Ultrasonic distance sensor
Questions
- What automatic treat dispensers are already available at stores or online? What features do they have?
- What features do you want to include in your automatic treat dispenser? What sensors do you want to use?
Bibliography
- Finio, B. (n.d.). How to Use an Arduino. Science Buddies. Retrieved April 2nd, 2024
- Science Buddies Staff (n.d.). Engineering Design Process. Science Buddies. Retrieved April 2nd, 2024
- Söderby, K. (2021, November 18). Liquid Crystal Displays (LCD) with Arduino. Arduino. Retrieved April 4th, 2024
- Söderby, K. (2024, January 23). Arduino UNO R4 Minima Real-Time Clock. Arduino. Retrieved April 4th, 2024.
- Fried, F. (n.d.). Adafruit DS3231 Precision RTC Breakout. Adafruit. Retrieved April 4th, 2024.
Materials and Equipment 
Recommended Project Supplies

This is an engineering design project, so your materials list may vary depending on what features you want to include with your dispenser. Parts may be available in different quantities and prices from different vendors.
- Electronics
- Science Buddies Electronics Kit for Arduino, available from our partner Home Science Tools. You will need the following parts from the kit:
- Arduino-compatible microcontroller board
- USB cable
- Breadboard
- Jumper wires
- Potentiometer
- LED
- Current-limiting resistors (220 Ω for UNO R3, 470 Ω for UNO R4)
- Pushbutton
- 10 kΩ resistor
- SG90 servo motor
- Additional jumper wires. Longer flexible wires are best for making connections from the breadboard to the Arduino, but shorter solid-core jumper wires are better for making connections on the breadboard.
- Male to male header pins
- 1602 LCD screen (optional).The example code is written for a screen that uses parallel communication, so make sure you do not buy a screen with "I2C" in the description. If you do, you will need to use different code for I2C communication.
- Active buzzer (optional). Replace with passive buzzer if you want to play different tones.
- Real-time clock (required if you want to dispense treats at certain times)
- If you are using an Arduino UNO R4 Minima (or equivalent), there is a built-in RTC but no battery backup, so the time will reset if your Arduino loses power. This works for a science project demonstration, but should not be used for critical medication.
- If you are using an Arduino UNO R3, or if you want a backup battery feature, then we recommend an external RTC like this one from Adafruit.
- Optional: other sensors such as an ultrasonic distance sensor (included in Science Buddies kit) or PIR sensor
- Science Buddies Electronics Kit for Arduino, available from our partner Home Science Tools. You will need the following parts from the kit:
- Additional tools and supplies to build your dispenser. Note that many pets will quickly chew through a cardboard dispenser to get to the treats. The dispenser shown in Figure 1 works for a demonstration at a science fair, or you can place it on a counter/shelf where your pet cannot reach it, so it can drop treats onto the floor.
- Cardboard
- Cardstock
- Popsicle sticks
- Scissors
- Hot glue gun
- Candy (to use for demonstration instead of real medication)
Experimental Procedure
- Build your dispenser. Figures 2 through 4 show several different views of the device. You can choose to make your dispenser using craft supplies or 3D-printed parts if you have access to a 3D printer. Your assembly procedure may vary depending on the materials you use. Please note that this dispenser is meant for demonstration purposes or to be placed on a counter or shelf where your pet cannot reach it. Even if you add a lid to the dispenser, many pets may chew through it to get to the treats. You would need to build a much sturdier dispenser using stronger materials (like hard plastic) if you want to leave your dispenser on the floor.
- Cut a hole in a piece of cardboard so the top of the servo motor fits through.
- Glue the servo to the bottom of the cardboard, so the top sticks through the hole.
- Build legs to support the four corners of the cardboard.
- Place a circular wall on top of the cardboard, centered around the servo. A cardboard tube from the inside of a roll of duct or masking tape works well.
- Make dispenser compartments by gluing popsicle sticks together. Use a protractor if you want to measure exact angles. You will need to decide how many compartments you want, which in turn will determine how far the servo should rotate.
- Attach the servo horn to the motor (do not use a screw, just push it on) and carefully glue the popsicle sticks to the servo horn. Be careful not to use too much glue, you may need to pull the servo horn off later to make adjustments.
- Cut a pie-shaped wedge in the cardboard, the same size and shape as one of the dispenser slots.
- Build a ramp under the hole so the treats will slide down into a tray (omit the tray if you want the treats to fall off a counter or shelf onto the floor).
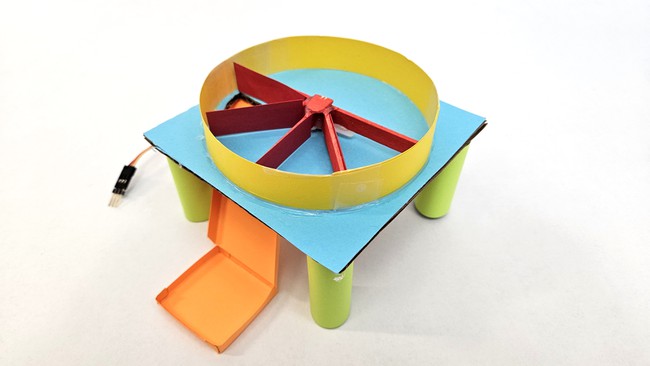 Image Credit: Ben Finio
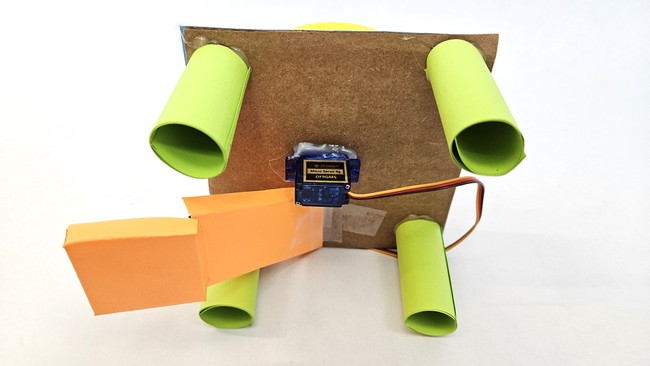 Image Credit: Ben Finio
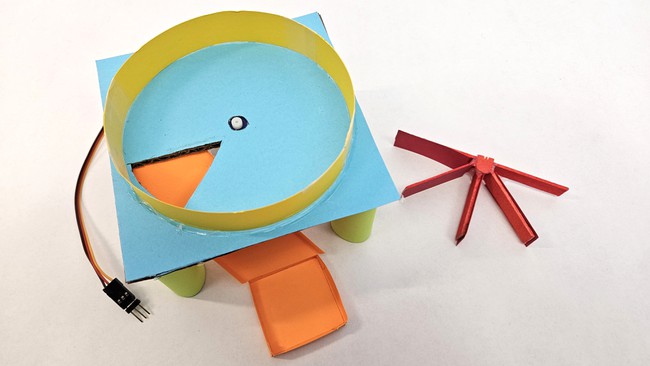 Image Credit: Ben Finio
- Assemble the circuit as shown in Figures 5 and 6. You will need to know how to use a breadboard. Make sure your Arduino is not plugged into USB power as you build the circuit. That will give you a chance to double-check all of your wiring before powering the Arduino on. Note that this diagram assumes you are using an Arduino UNO R4 with a built-in real-time clock. If you are using an external RTC, you will either need a bigger breadboard, or you will have to remove some components (like the buzzer) from the breadboard to make room for the RTC. See our external RTC tutorial for instructions on wiring an external RTC. You will need to modify the circuit if you are using other sensors.
- LCD connections. Note that pin labels may vary depending on where you bought your board. Pin numbers go from left to right when viewing the screen horizontally, but from bottom to top in Figure 6 since the screen is rotated.
- Pin 1 (VSS or GND) to GND
- Pin 2 (VDD or VCC) to 5V
- Pin 3 (V0) to potentiometer center pin
- Pin 4 (RS) to Arduino pin 12
- Pin 5 (RW) to GND
- Pin 6 (E) to Arduino pin 11
- Pin 7 (D0) - not used
- Pin 8 (D1) - not used
- Pin 9 (D2) - not used
- Pin 10 (D3) - not used
- Pin 11 (D4) to Arduino pin 5
- Pin 12 (D5) to Arduino pin 4
- Pin 13 (D6) to Arduino pin 3
- Pin 14 (D7) to Arduino pin 2
- Pin 15 (LED or A) to current limiting resistor to 5V
- Pin 16 (LED or K) to GND
- Potentiometer
- One outer pin to 5V
- Center pin to pin 3 (V0) on LCD screen
- Other outer pin to GND
- LED
- Positive (longer) leg to Arduino pin 7
- Negative (shorter) leg to current limiting resistor to GND
- Buzzer (optional)
- Positive pin to Arduino pin 8
- Negative pin to GND
- Pushbutton (optional)
- One side to 5V
- Other side to GND through 10 kΩ pull-down resistor and to Arduino pin 9
- LCD connections. Note that pin labels may vary depending on where you bought your board. Pin numbers go from left to right when viewing the screen horizontally, but from bottom to top in Figure 6 since the screen is rotated.
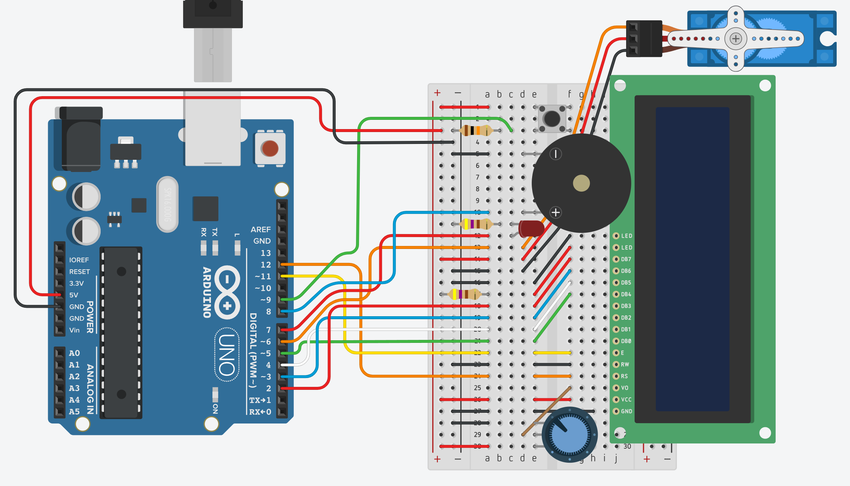 Image Credit: Ben Finio
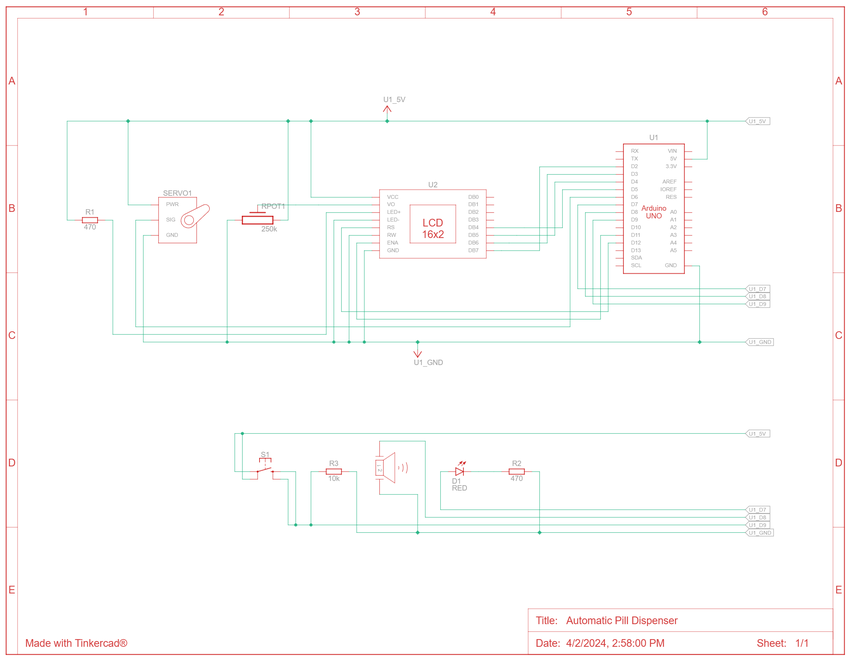 Image Credit: Ben Finio
- Download the treat dispenser example code. Read through the commented code so you understand how it works.
- This code is written for the internal RTC on an Arduino UNO R4 Minima. If you are using an external RTC module, you will need to modify the code. We have example code for an external RTC here.
- This code is written for a dispenser with four compartments. It automatically rotates the servo 45° once every 15 seconds. This works well for testing the device, but you will need to change the code to make it dispense treats at different times of day.
- You will need to change the code if you want to activate the motor based on another sensor instead of (or in addition to) the RTC.
- Upload the code to your Arduino and test it. Watch the motion of the dispenser. You may need to pop off the servo horn (this is why we said not to attach it with a screw earlier) and adjust it so the compartments align with the hole in the cardboard.
- If your device does not work as expected (the servo does not rotate, the LCD screen does not display correctly, etc.) you will need to troubleshoot or debug your circuit. This is a complicated circuit with a lot of parts. It is easy to misplace a wire on the breadboard, which can prevent one or more parts of the circuit from working properly. You will need to carefully double and triple-check all of your connections. It also helps to have someone else double-check your wiring, just like you might ask someone else to proofread your writing. Sometimes it can be hard to spot your own mistakes. If you get stuck or frustrated, take a break from working on your circuit and come back to it later. You might notice something that you did not notice before.
- Load some treats into your dispenser compartments and test it again. Make sure there are no issues with your ramp or tray, such as the treats getting stuck or sliding down too fast and bouncing out of the tray. Make adjustments to your ramp and tray if needed.
- Once you have the device working with the example code, it is time to customize your code. The example code dispenses treats once every 15 seconds, which works well when testing or for a demonstration at a science fair. There are many things you can change and customize in the code:
- How often it dispenses treats. The example code does this once every 15 seconds, but for real-life use you will need to set different times of day. You can do this by adjusting the condition(s) in the
ifstatement that detects the time. - How far the servo rotates. The example code rotates the servo 45° at a time, which works for four compartments. You will need to change the
angleIncrementvariable if you have a different number of compartments. - The messages displayed on the LCD screen (useful for debugging or to display the time for a human, assuming your pet cannot read!).
- Whether you use the
flashLEDalarm function to alert your pet that a treat has been dispensed using a buzzer and/or LED.
- How often it dispenses treats. The example code does this once every 15 seconds, but for real-life use you will need to set different times of day. You can do this by adjusting the condition(s) in the
- Once you have completed testing your device and customizing the code, try some real-world testing if possible.
- Remember to put your dispenser up high on a counter or shelf where your pet cannot reach it, so it will drop the treats onto the floor.
- If you have any sort of motion-activated camera (home security camera, pet cam, trail cam, etc.), set it up with a good view of your treat dispenser before you leave for the day.
- Review the footage when you get home. Did your treat dispenser work as intended? Did it help give your dog something to do during the day? Does your dog learn to expect the treats (for example, do they start sitting near the dispenser waiting for the next one)?
- Based on your testing, what changes could you make to your treat dispenser to improve it?
Ask an Expert
Variations
- Build a dispenser with a larger hopper so you can automatically dispense entire meals instead of just a few treats. Now you can feed your dog in the morning without getting out of bed!
- Look up a Bluetooth tutorial for Arduino. Can you build a treat dispenser that you can control with your phone?
- Build a sturdier treat dispenser that you can safely leave on the floor with your dog. Note that some pets might still try to chew through hard materials to get to the food, so get help from an adult for this variation of the project.
Careers
If you like this project, you might enjoy exploring these related careers:


Contact Us
If you have purchased a kit for this project from Science Buddies, we are pleased to answer your questions.In your email, please follow these instructions:
- What is your Science Buddies kit order number?
- Please describe how you need help as thoroughly as possible:
Examples
Good Question I'm trying to do Experimental Procedure step #5, "Scrape the insulation from the wire. . ." How do I know when I've scraped enough?
Good Question I'm at Experimental Procedure step #7, "Move the magnet back and forth . . ." and the LED is not lighting up.
Bad Question I don't understand the instructions. Help!
Good Question I am purchasing my materials. Can I substitute a 1N34 diode for the 1N25 diode called for in the material list?
Bad Question Can I use a different part?
Contact Us
Related Links
- Science Fair Project Guide
- Other Ideas Like This
- Electricity & Electronics Project Ideas
- Computer Science Project Ideas
- My Favorites