Abstract
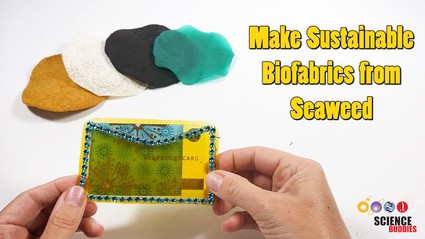
Can you imagine clothing, handbags, or shoes made from seaweed or spider silk? To become more sustainable, the textile industry is looking for ways to develop more eco-friendly fabrics. Biofabrics derived from living organisms such as seaweed or bacteria have been proposed as a potential alternative to conventional fibers. In this science project, you will make several biofabrics from alginate (seaweed) and conduct tests to find out which one is most suitable as a textile replacement.Summary
Procedure for making the alginate-based biofabrics adapted from Fabricademy under CC By-NC 4.0.
Valuable input provided by Anastasia Pistofidou, Fabricademy co-founder.
Objective
Make several biofabrics from alginate (seaweed) and investigate how the properties of the fabrics change depending on the ingredients.
Introduction
Textiles or fabrics are a diverse group of materials, and they are not only used to make clothing. They are also used to make furniture, medical equipment, bags, sports gear, the interior of cars, and much more. For this reason, the textile industry is a significant contributor to the global economy.
One role of scientists and engineers in an industry like textiles is to evaluate the environmental impacts of the products they make and figure out how those impacts can be reduced. Environmental impacts in the fashion industry include greenhouse gas emissions, water pollution, and the production of massive amounts of waste. You can read more details about the environmental impact of the fashion industry in the references provided in the Bibliography section. Because of these problems, sustainability has become a new focus in the fashion industry.
But how can a whole industry become more sustainable?
One solution may be to make "greener" products and embrace the concept of green chemistry. What does this mean? It means designing more eco-friendly materials and incorporating sustainable methods into the textile industry.
There are 12 principles that guide the green chemistry movement. These include reducing waste, minimizing the use and creation of harmful chemicals, and using energy and natural resources more efficiently. In the video below, you can hear Paul Anastas, one of the founders of the green chemistry movement, explain the concept of green chemistry.

There are two major categories of fibers used in textiles: natural fibers and synthetic fibers. Natural fibers are made from plants and animals. Examples include cotton, silk, and wool (Figure 1). This means natural fibers are made from renewable resources and are usually biodegradable. However, the growth and production of natural fibers require a lot of land, soil, and water. Cotton farming also requires a lot of harmful chemicals, such as pesticides.
Synthetic fibers, on the other hand, are human-made and produced from chemicals. Examples are polyester, nylon, and spandex (Figure 1). Environmental concerns about synthetic fibers include the emission of greenhouse gases and the use of harmful chemicals while making them, as well as their limited biodegradability.
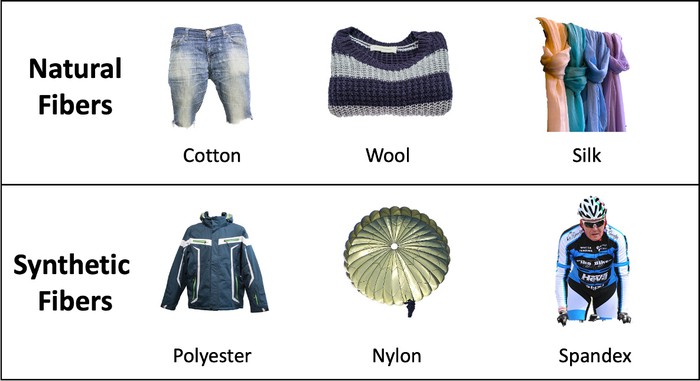 Image Credit: Svenja Lohner, Science Buddies / Science Buddies
Products made from natural fibers include cotton denim jeans, a wool sweater and a silk scarf. Products made from synthetic fibers include a polyester ski jacket, a nylon parachute, and a spandex cyclist outfit.
Figure 1. Examples of textiles made from natural and synthetic fibers.
One way that the textile industry could become more sustainable is by replacing old fabrics with new biopolymers. New biopolymers that could potentially replace existing textile fibers include alginate, collagen, and polyhydroxyalkanoate (PHA), as shown in Figure 2. The benefits of these polymers include being derived from natural and renewable resources, being (usually) non-toxic, and being fully biodegradable.
Biopolymers are natural polymers that are produced by living organisms such as plants or bacteria. Like other polymers, biopolymers are large molecules that consist of long, repeating chains of individual molecules. Collagen is a fiber-like protein that is commonly found in animal tissues and bones. PHAs are natural polyesters that are produced by many different bacteria, and alginate is a polymer made from sugars derived from seaweed. Companies such as AlgiKnit (alginate), Modern Meadow (collagen), or MangoMaterials (PHA) are currently investigating how these biomaterials can be integrated into the fashion production cycle.
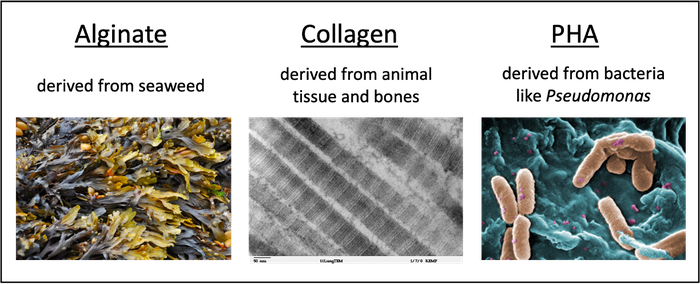 Image Credit: Svenja Lohner, Science Buddies / Science Buddies
Alginate is derived from seaweed. Collagen is derived from animal tissue and bones. PHA is derived from bacteria, such as Pseudomonas.
Figure 2. Biopolymers, such as alginate, collagen, and polyhydroxyalanoates, are promising alternatives to conventional textile fibers.
In this science project, you will explore biopolymers made from alginate. You will investigate how the material properties of alginate-based biofabrics change depending on their ingredients.
One ingredient commonly added to polymers like plastic is glycerin (also called glycerol), a non-toxic, colorless liquid typically made from soybean, coconut, or palm oils. The addition of glycerin can change the properties of a product. This is because glycerin acts as a plasticizer, which means it makes plastic smoother and more flexible.
How is this relevant to textiles? Textile fibers have different mechanical properties that determine their durability. There include their tensile, flexural, and torsional properties.
- Tensile strength measures how strong a material is when you put it under tension or pull on it from both ends. In other words, it measures how hard you can pull on the material before breaking it.
- Flexural properties are relevant to clothing because they show how a material behaves when it is bent—for example, when you bend your elbows or your knees.
- Torsional properties determine how a material behaves when it is twisted.
You can find more information about how these material tests are performed in the textile industry in the Bibliography section.
In this project, you will use a variety of quantitative and qualitative testing methods to assess the tensile strength, flexibility, and other mechanical properties of your biofabrics. Based on your test results, you will be able to assess which of your biofabric recipes is most suitable as a textile replacement.
Terms and Concepts
- Textile
- Fabric
- Fast fashion
- Environmental impact
- Greenhouse gas emissions
- Sustainability
- Green chemistry
- Natural fiber
- Synthetic fiber
- Renewable resource
- Biodegradable
- Polyester
- Nylon
- Spandex
- Biopolymer
- Alginate
- Collagen
- Polyhydroxyalkanoate (PHA)
- Polymer
- Molecule
- Glycerin or glycerol
- Plasticizer
- Mechanical property
- Tensile strength
- Flexural property
- Torsional property
Questions
- Why is the textile industry an important industry globally?
- What does "fast fashion" mean, and what are its environmental impacts?
- What are the 12 principles of green chemistry?
- What are biopolymers and how could they make the textile industry more sustainable?
Bibliography
- United Nations Environment Programme, UNEP. (2018, November 12). Putting the brakes on fast fashion. Retrieved January 10, 2023.
- Market Analysis Report. (n.d.). Textile Market Size, Share and Trends Analysis Report By Raw Material (Cotton, Wool, Silk, Chemical), By Product (Natural Fibers, Nylon), By Application (Technical, Fashion), By Region, And Segment Forecasts, 2022-2030. Grand View Research. Retrieved January 10, 2013.
- Drew, D. and Yehounme, G. (2017, July 5). The Apparel Industry's Environmental Impact in 6 Graphics. World Resources Institute. Retrieved January 10, 2023.
- Vartan, S. (2017, December 10). Fashion Forward: How Three Revolutionary Fabrics Are Greening the Industry. JSTOR. Retrieved January 10, 2023.
- Kiron, M. I. (2011, July 21). Types of Mechanical Properties of Textile Fibers and Materials. TextileLearner. Retrieved January 10, 2023.
The following resources show how mechanical property testing is conducted using special machines in the industry.
- Instron (n.d.). What is Torsion Testing? Retrieved January 10, 2013.
- Instron (n.d.). What is Bend Testing? Retrieved January 10, 2013.
- ADMET Testing Systems (n.d.). Polyurethane Foam Tensile Strength Test - ASTM D3574 Test E. Retrieved January 10, 2013.
Materials and Equipment 
Recommended Project Supplies
Materials for making the biofabrics
- Spherification Kit, available from our partner
Home Science Tools. You will need these items from the kit:
- Sodium alginate
- Calcium chloride
- You will also need to gather these items not included in the kit:
- Wooden embroidery hoop, 7" diameter. Available on Amazon. You will need three hoops to prepare all three recipes in parallel. Otherwise, you will have to make one biofabric piece at a time, which can take several days.
- Textured fabric that is dense but not waterproof, like canvas. The material should be big enough to fill the wooden hoop.
- Scissors
- Scale
- Small bowls (2)
- Measuring cup
- Water (600 mL)
- Optional: food coloring
- Glycerin
- Refrigerator
- Spray bottle
- Spoon
- Paper towels
- Immersion blender
- Pen or pencil
- Lab notebook
Additional materials for biofabric testing
- Screw compressor clamps (2). Available on Amazon.
- String
- Caliper. Available on Amazon.
- Something to measure forces, such as
- Option A: Spring scale, >10 kg. Available on Amazon.
- Option B: Container, such as a small bucket, and metal or sand to use as weight
- Calculator
- Sewing needle
- Sewing thread
Optional: Additional materials for making biofabrics with solid food waste
- Solid food waste, such as eggshells, coffee grounds, or orange peels
- Oven
- Blender or mortar
Experimental Procedure
Creating Your Alginate Biofabric
In this experiment, you will investigate how the properties of your biofabric change when you add different concentrations of glycerin. The three different biofabric recipes you will make are provided in Table 1. Follow the written procedure below or watch the alginate biofabric video to view each step of the procedure.
| Ingredients | Recipe #1 | Recipe #2 | Recipe #3 |
|---|---|---|---|
| Liquid | 200 mL | 200 mL | 200 mL |
| Sodium Alginate | 4 g | 4 g | 4 g |
| Glycerin | 8 g | 4 g | 0 g |
| Glycerin concentration | 4 g/100 mL | 2 g/100 mL | 0 g/100 mL |
- Prepare your alginate biofabric mixture. If you purchased three wooden hoops and have enough other materials, you can make all three recipes at once. If you do not have enough materials, start with recipe #1.
- Fill the measuring cup with 200 mL of water. Optionally, you can add food coloring to the water to dye your biofabric.
- Add 4 grams of sodium alginate to the liquid and mix thoroughly with an immersion blender, as shown in Figure 3.
- Add the glycerin and mix again. For recipe #1, add 8 g of glycerin; for recipe #2, add 4 g of glycerin; and for recipe #3, do not add any glycerin (see Table 1).
- Place the alginate mixture in the refrigerator for several hours or overnight to get rid of the bubbles.
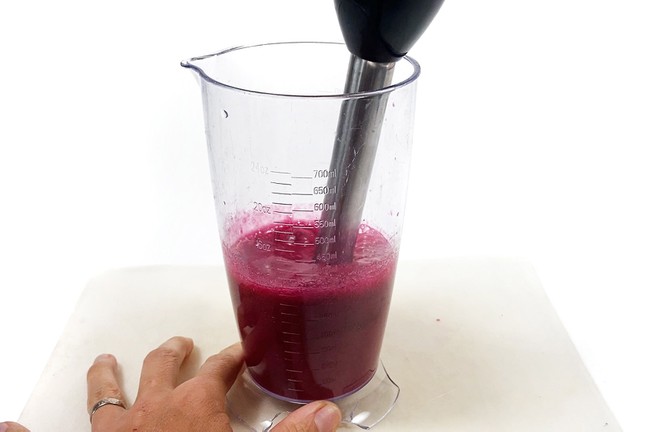 Image Credit: Svenja Lohner, Science Buddies / Science Buddies
Figure 3. The alginate mixture is mixed with an immersion blender. - Prepare the calcium chloride solution.
- In a cup or small bowl, mix 10 g of calcium chloride with 100 mL of water. This makes a 10% calcium chloride solution.
- Stir the solution with a spoon until all the calcium chloride has dissolved.
- Pour the solution into a spray bottle. The solution can be stored at room temperature for several weeks.
- Take your sodium alginate mixture out of the refrigerator. It should be bubble free. Use a spoon to carefully scoop out any foam from the liquid's surface.
- Cut a piece of canvas that fits your wooden hoop. Place the cut canvas piece in your wooden hoop as shown in Figure 4. Pull it straight and secure it tightly. This is the mold for your biofabric.
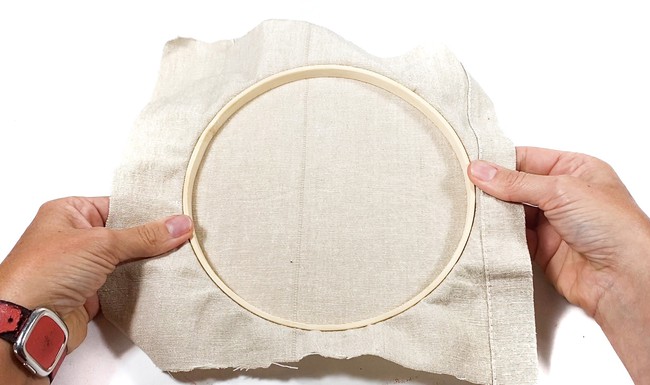 Image Credit: Svenja Lohner, Science Buddies / Science Buddies
Figure 4. Prepared biofabric mold consisting of a wooden embroidery hoop and canvas. - Shake the spray bottle with the calcium chloride solution, then spray the canvas in your prepared mold with calcium chloride. The canvas should be wet but not soaked. Use a paper towel to remove excess chloride solution from the canvas's surface.
- Pour the alginate mixture into the biofabric mold.
- The alginate mixture in the mold should be about 3–4 mm thick. Let the mixture spread out in the mold. You can use a spoon to distribute it evenly.
- Carefully move the spoon across the canvas surface and around the wooden hoop to ensure good contact of the alginate mixture with the canvas surface. This helps the biofabric stick to the canvas, which will reduce the shrinking of the fabric while drying.
- Remove any larger air bubbles on the surface of the alginate mixture with a spoon.
- Spray the surface of the alginate mixture with calcium chloride solution, as shown in Figure 5. The solution should cover the whole surface of the alginate mixture. Let the solution sit on the surface for 10 seconds, then remove the excess liquid with a paper towel. Note: When spraying the alginate solution with calcium chloride, calcium alginate is formed, which creates a membrane-like layer on the surface of the alginate mixture. If the alginate mixture does not stick well to the wooden hoop or canvas, the mixture could shrink and detach from the sides of the hoop. If this happens, make a note in your data table. You can still use your fabric for the remainder of the project.
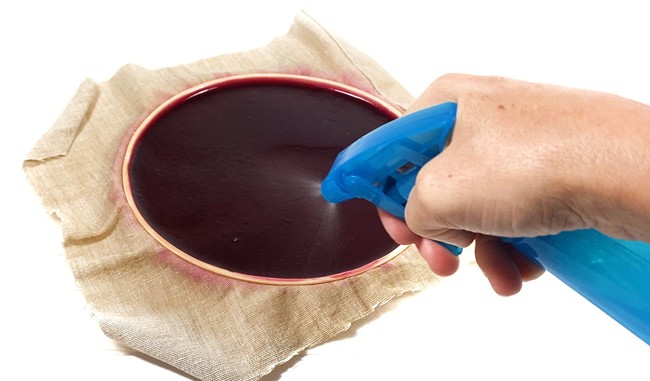 Image Credit: Svenja Lohner, Science Buddies / Science Buddies
The alginate mixture is spread out in the biofabric mold, which consists of a wooden embroidery hoop and a piece of canvas. A hand is holding a spray bottle and spraying solution onto the surface of the alginate mixture.
Figure 5. Spray enough calcium chloride on the alginate mixture so that the whole surface is covered. - Place the biofabric on an oven rack and let it dry. There should be airflow from below. Drying can take several days. You can either let it air dry or dry over a radiator or in a dehydrator to accelerate the drying process. Note: The biofabric will shrink during the drying process as it loses water. It will get thinner and, if the mixture doesn't stick well to the canvas, will shrink in size. As it shrinks in size, the fabric can curl on its sides. If you see this happen, you can either alternate drying and pressing the biofabric under a stack of books or dry the biofabric on a rack with a weight on top to keep it flat.
- When the biofabric is dry, remove the canvas from the wooden hoop and carefully peel the biofabric off the canvas, as shown in Figure 6.
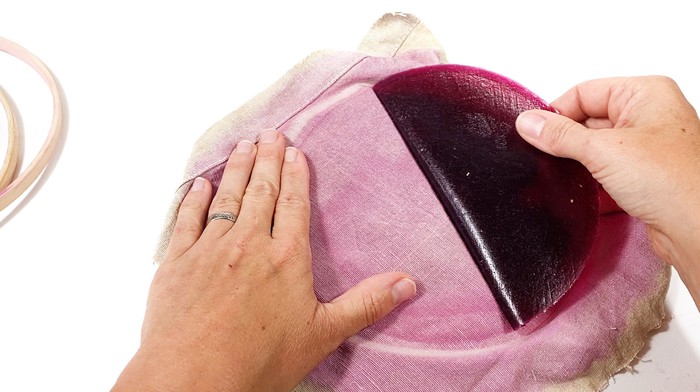 Image Credit: Svenja Lohner, Science Buddies / Science Buddies
Figure 6. Be careful not to break the biofabric when peeling it off the canvas. - Repeat steps 1, 3, and 5–9 for the two remaining recipes. Don't forget to change the amount of glycerin in each recipe (see Table 1). You can reuse your fabric mold. If necessary, prepare more calcium chloride solution by following step 2.
Testing Your Alginate Biofabric
To assess which of your biofabric recipes would be most suitable for a textile replacement, you will do several tests to determine various mechanical properties of your different biofabrics. Follow the written procedure below or watch the material testing video to view each testing step.
- Qualitative description. Before you start cutting your biofabric for testing, look at each of your fabrics closely and make notes about how the material looks, feels, etc. Record your observations in a data table like Table 2.
Table 2. Data table to record the qualitative features of the different biofabrics.Sample Qualitative description of biofabric 8 g glycerin 4 g glycerin 0 g glycerin - Tensile test. In this test, you will investigate how your different biofabrics behave when they are stretched by measuring their tensile strength. Tensile strength is the load or force at failure divided by the cross-sectional area of the sample. Its unit is pascals (Pa) or megapascals (MPa).
Equation 1:
To measure the tensile strength, make a data table like Table 3 in your lab notebook and follow steps a–g for each of your three biofabric materials.- Cut one 0.5 cm × 4 cm strip of your biofabric. Don't cut it from the very edges, as these tend to be thinner. Choose a section that is free of defects such as small tears, bubbles, or ridges.
- Measure the thickness and width of your strip using a caliper, as shown in Figure 7. Convert your measurements to meters and record the results in your data table. Then calculate the cross-sectional area of your test sample. Record the result in your data table.
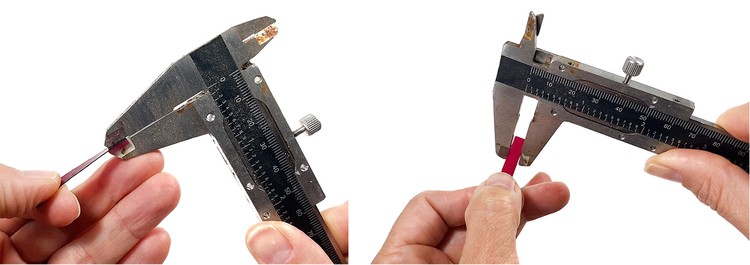 Image Credit: Svenja Lohner, Science Buddies / Science Buddies
Figure 7. Thickness and width measurements with a caliper. - Place each end of one strip into one of the clamps. The end of the sample strip should line up with the end of the metal clamp. Make sure to secure the strip tightly in the clamp.
- Do the tensile test. There are two ways to stretch the materials.
- Option A. If you have a spring scale, attach a string to one clamp, as shown in Figure 8.
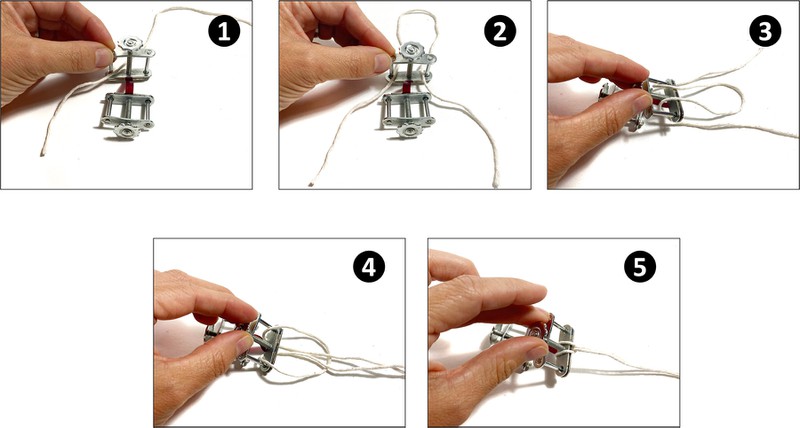 Image Credit: Svenja Lohner, Science Buddies / Science Buddies
Figure 8. Instructions on how to attach a string to one of the compressor clamps.Attach the hook of the spring scale to the string loop. Hold the other clamp with one hand upright on the table. Do NOT move the clamp during the test. The test setup should look like in Figure 9.
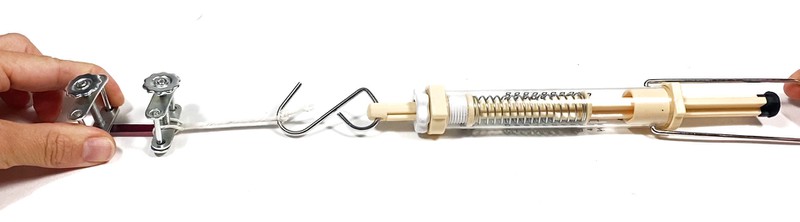 Image Credit: Svenja Lohner, Science Buddies / Science Buddies
A hand holds one of the clamps attached to the ends of the sample strip. The other clamp is attached to a spring scale, and a second hand pulls the spring scale to stretch the fabric sample.
Figure 9. Tensile test setup using a spring scale.Then very slowly pull the spring scale straight away from the clamp so that your sample gets stretched. Be careful not to bend or twist the sample. While pulling, make sure to monitor the readings on the spring scale. Pull until the sample strip breaks. Make sure that the sample broke somewhere in the middle and did not just slip off the clamp. Record the force (in newtons) that made the sample break in your data table. If your scale measures in pounds or kilograms, convert the force to newtons (1 lb = 4.448 N, 1 kg = 9.81 N—but only if you're in Earth's gravity!) Reset your scale to zero if you are using a trigger scale.
- Option B. Attach a string to both clamps as shown in Figure 10.
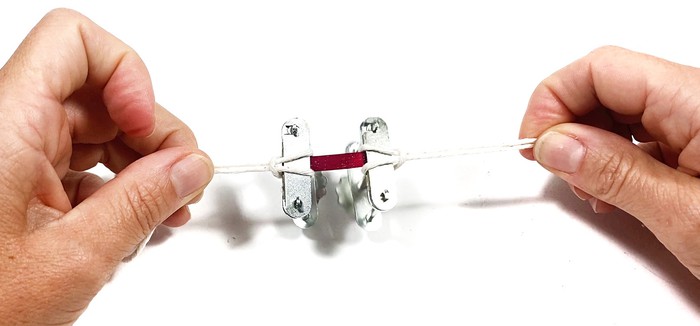 Image Credit: Svenja Lohner, Science Buddies / Science Buddies
Two compressor clamps hold the ends of a biofabric sample strip. To each compressor clamp, a string is attached.
Figure 10. A string attached to each compressor clamp holding the biofabric sample.Use the string to attach one clamp to a door handle or other sturdy object. The clamps should hang freely in the air. Use the string on the other (bottom) clamp to attach a container, like a cup or small bucket. Make sure that the container is close to the ground. This avoids spillage of its contents if your sample breaks. The test setup should look like Figure 11. Gradually add weight (e.g., metal or sand) to the container until the sample strip breaks.
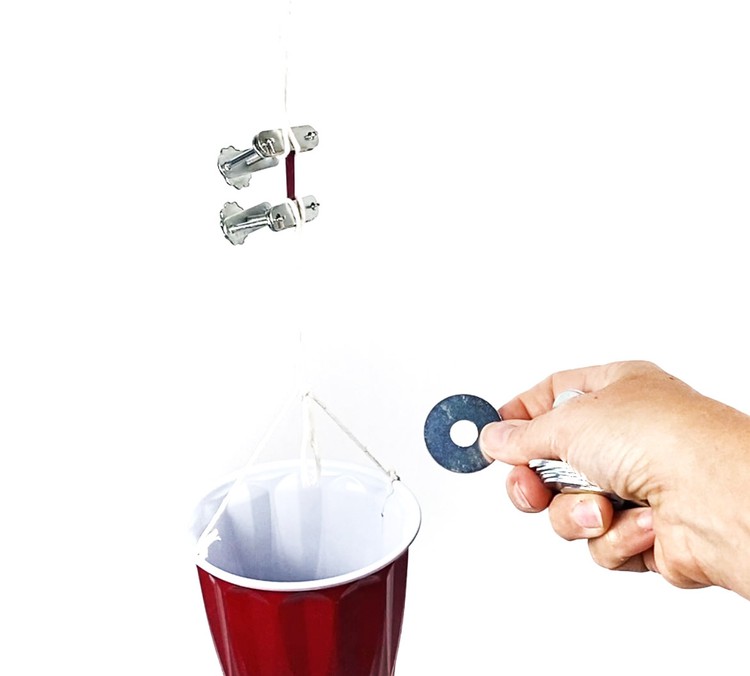 Image Credit: Svenja Lohner, Science Buddies / Science Buddies
Figure 11. Tensile test setup with a cup and weight.Again, make sure that the sample broke somewhere in the middle and did not just slip off the clamp. When the sample fails, weigh the filled container and record the weight that caused the sample to break in your data table. If needed, convert the weight to newtons first. (1 lb = 4.448 N, 1 kg = 9.81 N—but only if you're in Earth's gravity!)
Table 3. Data table to record your data from the tensile strength test.Sample Thickness
[m]Width
[m]Cross-sectional Area
[m²]
(Thickness × width)Maximum applied force
[newton]Tensile Strength
[MPa]Biofabric recipe #1 with 8 g glycerin #1 #2 #3 Average Biofabric recipe #2 with 4 g glycerin #1 #2 #3 Average Biofabric recipe #3 with 0 g glycerin #1 #2 #3 Average - Option A. If you have a spring scale, attach a string to one clamp, as shown in Figure 8.
- Use equation 1 and your data to calculate the tensile strength of your test sample. You might want to convert your result from pascals to megapascals (1 Pa = 1 × 10⁶ MPa). Record your result in your data table.
- Repeat the tensile test with the remaining two material strips.
- Torsion test. In this test, you will investigate how your different biofabrics behave when they are twisted. To do the torsion test, make a data table like Table 4 in your lab notebook and follow steps a–d for each of your three biofabric materials.
- Cut one 0.5 cm × 4 cm strip of your biofabric. Don't cut it from the very edges, as these tend to be thinner. Choose a section that is free of defects such as small tears, bubbles, or ridges.
- Place each end of one strip into one of the clamps. The end of the sample strip should line up with the end of the metal clamp. Make sure to secure the strip tightly in the clamp.
- Hold each clamp in one of your hands with the screws both facing up, as shown in Figure 12. To twist your sample, keep one clamp still and rotate the other clamp so its screw is facing down. Now you have rotated the clamp halfway. Rotate the same clamp in the same direction so the screw is facing up again. This makes one rotation. Continue rotating the clamp in the same direction, half a rotation at a time, until the sample breaks. Record the number of rotations until the sample broke in your data table.
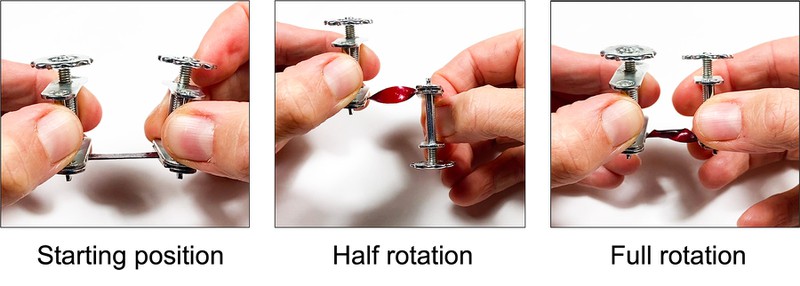 Image Credit: Svenja Lohner, Science Buddies / Science Buddies
Figure 12. Torsion test setup. - Repeat the torsion test with the remaining two material strips.
Table 4. Data table to record the number of rotations until the sample breaks from the torsion test.Trial Biofabric recipe with 8 g glycerin Biofabric recipe with 4 g glycerin Biofabric recipe with 0 g glycerin #1 #2 #3 Average - Flexure test. In this test, you will investigate how your different biofabrics behave when they are bent. To do the flexure test, make a data table like Table 5 in your lab notebook, and follow steps a–d for each of your three biofabric materials.
- Cut three 1 cm × 4 cm strips of your biofabric. Don't cut it from the very edges, as these tend to be thinner. Choose a section that is free of defects such as small tears, bubbles, or ridges.
- To bend your sample, fold it in half, as shown in Figure 13. Then slide your finger along the fold with some pressure as if you were folding a paper airplane. Remove your finger and observe what happens. Did the sample break? Did the material spring back into its original flat state, or did it stay folded? Can you see a fold line in the material? Record your observations in your data table.
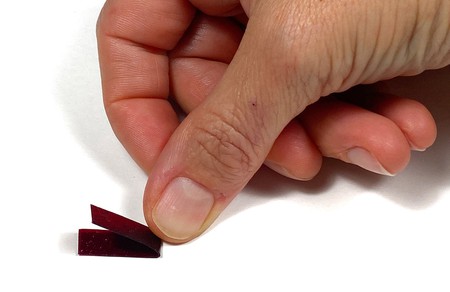 Image Credit: Svenja Lohner, Science Buddies / Science Buddies
Figure 13. Folding the sample strip in half. - Repeat the flexure test with the remaining two material strips.
Table 5. Data table to record your data from the flexure test.Trial Did the sample break? Does the material spring back
into its original flat state?Do you see the fold line? Biofabric recipe #1 with 8 g glycerin #1  yes
no
yes
no
yes
no
yes
no
yes
no
yes
no#2
yes
no
yes
no
yes
no#3
yes
no
yes
no
yes
noTotals __ yes __ no __ yes __ no __ yes __ no Biofabric recipe #2 with 4 g glycerin 8 g glycerin
yes
no
yes
no
yes
no4 g glycerin
yes
no
yes
no
yes
no0 g glycerin
yes
no
yes
no
yes
noTotals __ yes __ no __ yes __ no __ yes __ no Biofabric recipe #3 with 0 g glycerin 8 g glycerin
yes
no
yes
no
yes
no4 g glycerin
yes
no
yes
no
yes
no0 g glycerin
yes
no
yes
no
yes
noTotals __ yes __ no __ yes __ no __ yes __ no - Sewing test. In this test, you will investigate whether your biofabrics can be sewn easily, which is crucial for most textile applications. To do the sewing test, make a data table like Table 6 in your lab notebook, and follow steps a–d for each of your three biofabric materials.
- Cut two 3 cm × 3 cm square pieces of your biofabric. Don't cut it from the very edges, as these tend to be thinner. Choose a section that is free of defects such as small tears, bubbles, or ridges.
- Place one biofabric square on top of the other.
- Use a sewing needle and sewing thread and try to sew the biofabric squares together. Make a single straight stitch along the edges of the square using a backstitch. If you don't know how to backstitch, you can review this backstitch tutorial (Method 1).
- How easy or difficult is it to sew the material? Does the material break? Record your observations in your data table. Then rank your materials from easiest to sew (1) to hardest to sew (3) in your data table.
Table 6. Data table to record your data from the sewing test.Sample Can you sew your biofabric
without breaking it?Rank from easiest to sew (1)
to hardest to sew (3)Biofabric recipe #1 with 8 g glycerin
yes
noBiofabric recipe #2 with 4 g glycerin
yes
noBiofabric recipe #3 with 0 g glycerin
yes
no
Analyzing your Data
In this section, you will analyze your data and come up with a conclusion about which biofabric recipe makes the best textile replacement.
- Tensile strength data.
- For Table 3, calculate the average tensile strength for each glycerin concentration. Record the results in your data table.
- Make a bar graph of your data. Put the glycerin concentration on the x-axis and the average tensile strength on the y-axis.
- Torsion test data.
- For Table 4, calculate the average number of rotations that made the sample break for each glycerin concentration.
- Make a bar graph of your data. Put the glycerin concentration on the x-axis and the average number of rotations that made the sample break on the y-axis.
- Flexure data.
- Review your Table 5 and for each question count the total number of yes and no responses for each sample. Record the results in your data table.
- Look at your Tables (2–6), graphs, and observations and try to draw conclusions from your results about which biofabric recipe makes the best textile replacement. Try to take the following questions into consideration.
- What similarities or differences do you see among the different biofabrics?
- How did the amount of glycerin change the material properties of the different biofabrics?
- What function do you think glycerin has as an additive in your biofabric recipe?
- Can you explain your results?
- Which of the tests you conducted are the most relevant for a textile material?
- Is there a possibility that other factors could have affected your test results? If yes, which ones?
- Based on your results, which biofabric recipe do you think is best suited as a textile replacement?
- Do you think the biofabrics you made in this project are more or less sustainable than conventional fabrics? You might want to review the 12 principles of green chemistry to answer this question.
Optional: Making Alginate Biofabrics with Food Waste
This section is optional and shows how you can recycle food waste to make alginate biofabrics.
- Prepare the food waste that you want to add to your biofabrics recipe. There are several food wastes that you might want to try. Some suggestions are eggshells, coffee grounds, or orange peel.
- Collect about 30–50 grams of your chosen food waste and place it on a baking tray.
- Place the tray in an oven set to 300–350°F (150–180°C) and let the food waste dry completely. This can take up to several hours. Remove the dried food waste from the oven and let it cool.
- Use a blender or a mortar to grind the dried food waste into a powder.
- To make your food waste biofabrics, follow steps 1–9 in the Creating Your Alginate Biofabric section above. Use the recipe in Table 7 for your biofabric. Add the food waste powder together with the glycerin.
Table 7. Biofabrics recipe with added food waste powder.Ingredients Recipe #1 Liquid 200 mL Sodium Alginate 4 g Glycerin 8 g Food waste powder 10 grams Note: Sodium alginate reacts with calcium to create calcium alginate, which makes the liquid become thick and gelatinous. Take this into account when experimenting with calcium-rich food waste, such as fruit. In addition, biofabrics with food waste tend to be thicker in general and shrink more than biofabrics with just liquid.
- Once your biofabric has dried, you can follow the steps in the Testing Your Alginate Biofabric section to assess its material properties.
Troubleshooting
For troubleshooting tips, please read our FAQ: Make Sustainable Fabrics from Seaweed.
Ask an Expert
Global Connections
The United Nations Sustainable Development Goals (UNSDGs) are a blueprint to achieve a better and more sustainable future for all.

Variations
- Experiment with other Iiquids to make your biofabric. Instead of using water you can, for example, use beet or avocado water, which is naturally dyed. What other liquids can you think of? Note: Sodium alginate reacts with calcium to create calcium alginate, which makes the liquid become thick and gelatinous. Take this into account when experimenting with calcium-rich liquids, such as some fruit juices or dairy.
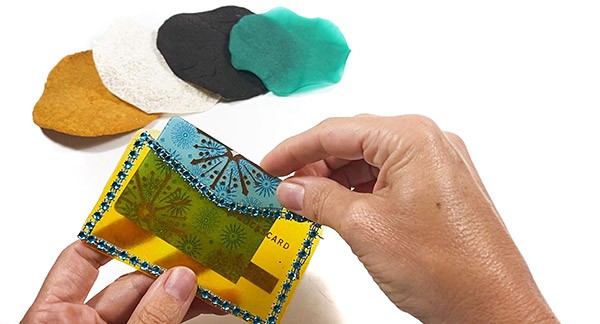
- The focus of this project is on creating a piece of biofabric and testing its material properties to find out if it is suited as a textile replacement. Take this project one step further by making biofabric to create an actual product! If you need larger pieces of biofabric, you can use larger wooden hoops or build your own wooden frame. Based on the material properties of your biofabric, think about what kind of product you can create. Then go ahead and design your product and make it! If you can't think of anything to make, you can get started with this easy cardholder wallet. Once you have finished making your product, you can decorate it.
- There is no limit to your creativity in this science project. Experiment with different types of food waste or liquids, or vary the amount of sodium alginate, food waste, or glycerin in your recipe. How do the properties of the materials change each time? Which is your favorite biofabric recipe?
- One thing you did not explore in this project is fatigue failure, which is what occurs when a material breaks after many repeated motions, even if those motions do not individually exceed its maximum strength limit. For example, for the torsion test, you twisted the material as far as possible until it broke. That situation is unlikely to occur with clothing since human limbs can only bend and twist a certain amount! Instead, you can try bending or twisting a material sample back and forth a fixed amount (such as 90 degrees) until it breaks.
- Twisting a material sample back and forth by hand until it breaks can get tiring! Can you build a machine to do it for you? See our How to Use an Arduino page, particularly the video about positional servo motors, for some inspiration. For example, you could attach one clamp to something fixed and sturdy, the other clamp to a servo motor, and use the motor to automatically twist a material sample back and forth. You can use the Arduino to count the number of twists so you do not have to sit there and count manually. For an extra challenge, you could try to figure out a way to automatically detect when the sample breaks and stop the count. That way, you could even leave the machine running overnight!
- When worn daily, clothes have to withstand a lot. The tests you performed in this experiment were mostly limited to the mechanical properties of your biofabric. But other properties are relevant to textiles, too! Think about what your clothes have to tolerate on a daily basis: They may get stained, washed, ironed, or exposed to rain and UV radiation from the sun. Can you come up with testing procedures to find out how your biofabric behaves when treated like real clothes?
- One principle of green chemistry (#10) is "Design for Degradation." It means producing products that degrade after they get thrown away. Design an experiment to find out how biodegradable your biofabric product is!
Frequently Asked Questions (FAQ)
Careers
If you like this project, you might enjoy exploring these related careers:


Contact Us
If you have purchased a kit for this project from Science Buddies, we are pleased to answer any question not addressed by the FAQ above.In your email, please follow these instructions:
- What is your Science Buddies kit order number?
- Please describe how you need help as thoroughly as possible:
Examples
Good Question I'm trying to do Experimental Procedure step #5, "Scrape the insulation from the wire. . ." How do I know when I've scraped enough?
Good Question I'm at Experimental Procedure step #7, "Move the magnet back and forth . . ." and the LED is not lighting up.
Bad Question I don't understand the instructions. Help!
Good Question I am purchasing my materials. Can I substitute a 1N34 diode for the 1N25 diode called for in the material list?
Bad Question Can I use a different part?
Contact Us
Related Links
- Science Fair Project Guide
- Other Ideas Like This
- Green Chemistry Project Ideas
- Materials Science Project Ideas
- My Favorites