Abstract
Earth's atmosphere, the ocean of air that blankets the planet, is mostly nitrogen and oxygen, with small amounts of other gases. How much oxygen is present in air at sea level? In air high up in the Appalachians or Rockies? Atop Mount Everest? How much oxygen is present in the air you breathe? Here's a project that shows you how to measure the percentage of oxygen in an air sample.Summary
Andrew Olson, Ph.D., Science Buddies
Damon Kawamoto, Science Buddies Summer Science Fellow, 2011
Sources
- WGBH Educational Foundation, 2005. "Everest: The Death Zone," NOVA, http://www.pbs.org/wgbh/nova/teachers/activities/2506_everest_01.html.

Objective
Measure the percentage of oxygen in air samples.Introduction
We live near the bottom of an ocean of air that surrounds the earth. The atmosphere protects us from harmful radiation from the sun, yet captures enough of the sun's light and warmth to make the planet habitable. Speaking of habitable, the atmosphere also contains the oxygen we need to breathe to support cellular respiration, the metabolic process that provides the chemical energy necessary for life.
How much oxygen is in the air? This project will show you an interesting way to measure the percentage of oxygen in a sample of air in a test tube. The method depends on atmospheric pressure and a chemical reaction that removes oxygen from the air.
So what kind of chemical reaction can remove oxygen from the air? Oxidation of iron, also known as rusting, will do the trick. Exposed iron will rust in the presence of oxygen and water. As you do your background research, study this chemical reaction, and you will see that oxygen becomes combined with the iron atoms and water to create iron oxides.
You'll use plain, fine steel wool (available at the hardware store) as your source of iron, placing it in the bottom of a test tube. Then, you'll dampen the steel wool, turn the test tube upside down, and mount it so that the mouth is submerged under water. This will trap the air in the test tube and also provide water vapor for the oxidation reaction. You will have all of the chemicals necessary for the reaction: iron in the steel wool, plus oxygen and water vapor in the air in the test tube. As the iron rusts, oxygen is removed from the air sample in the test tube. With less gas, there will be lower pressure inside the test tube (fewer gas molecules bouncing around, pushing on the walls of the test tube and the surface of the water inside the tube). Meanwhile, your experiment will continue to be under the (more or less) constant pressure of the ocean of air, atmospheric pressure. So what will happen to the water level in the test tube as the oxygen in the air sample becomes sequestered in iron oxide?
That's how you'll measure the percentage of oxygen in your air sample. By measuring the water level at the start of the experiment, and at the end (when the water level has stopped changing), you can take the difference to find out how much oxygen was used to oxidize the steel wool.
How does oxygen content change with altitude? Can you use this method to find out?
Terms and Concepts
To do this project, you should do research that enables you to understand the following terms and concepts:- Atmosphere
- Oxygen
- Atmospheric pressure
- Oxidation
- Rusting
Questions
- What are the gases that comprise Earth's atmosphere?
- What chemical reaction occurs when iron rusts?
- Why does the water level in the test tube rise as the steel wool oxidizes?
- Why does the water level eventually stop rising?
- What would happen if a larger piece of steel wool was used? A much smaller piece?
Bibliography
This NASA website has information about atmospheric pressure:- Sample, S. (2003). It's a Breeze: How Air Pressure Affects You. Retrieved July 13, 2011.
These websites have information about the atmosphere:
- Sharp, Tim. (2017, October 13). Earth's Atmosphere:Composition, Climate & Weather. Space.com. Retrieved March 3, 2021.
- Cirjak, Antonia. (2020, May 1). What Are The 5 Layers Of The Earth's Atmosphere?. Worldatlas.com. Retrieved March 3, 2021.
- Wikipedia Contributors (2011, June 30). Rust. Retrieved July 13, 2011.
Materials and Equipment
- Test tubes (6), all the same size; available from online suppliers such as Carolina Biological Supply Company.
- Masking tape
- Permanent marker
- Jars or bottles (6); clean, clear, and each with the same height. You may find suitable jars around your home, or they are available from online suppliers such as Carolina Biological Supply Company
- Ring stands with clamps (6). Ring stands and clamps are available from Carolina Biological Supply Company.
- Alternative: if you cannot borrow these from school, you can make your own device to hold the test tubes over the jars. See Figures 2 and 3 for more details.
- Steel wool (1 pad). Steel wool is available from most grocery stores or from online suppliers such as Carolina Biological Supply Company.
Disclaimer: Science Buddies participates in affiliate programs with Home Science Tools, Amazon.com, Carolina Biological, and Jameco Electronics. Proceeds from the affiliate programs help support Science Buddies, a 501(c)(3) public charity, and keep our resources free for everyone. Our top priority is student learning. If you have any comments (positive or negative) related to purchases you've made for science projects from recommendations on our site, please let us know. Write to us at scibuddy@sciencebuddies.org.
Experimental Procedure
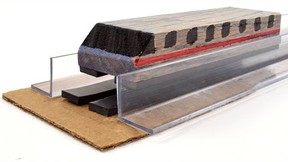
- Get your six ring stands ready. When the experiment is running, each of the six ring stands will look like the experimental setup in Figure 1.
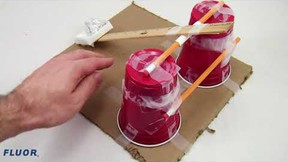
- If you do not have access to six ring stands, you can make your own test tube holder. Figure 2 shows a schematic for a homemade test tube holder. The photos in Figure 3 show an example of a homemade test tube holder constructed out of PVC pipe and rubber bands.
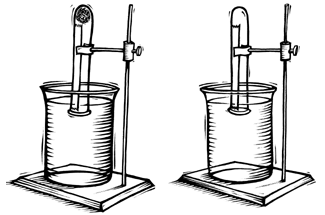
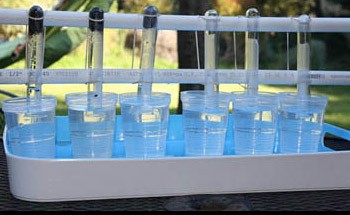
Figure 1. Diagram of basic experimental setup. Use at least three test tubes for each condition you test to ensure that your results are consistent across multiple trials.
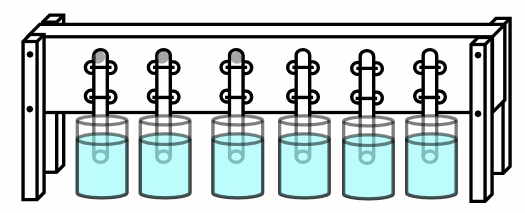
Figure 2. Alternate setup. If you don't have ring stands, you can make your own test tube holder with a piece of wood or pegboard. Mount the tubes between sets of holes, and hold them in place with rubber bands stretched tight and looped over nails or pegs on the back side. Add supports at the ends with height matched to your jars.
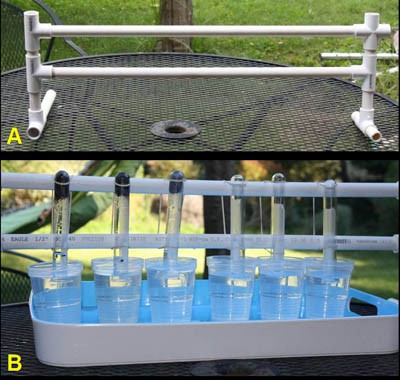 Image Credit: Science Buddies
Figure 3. You can make a homemade test tube holder out of any materials that are handy around the house. Here is an example of one constructed from PVC pipes. Rubber bands hold the test tubes securely in place.
- If you do not have access to six ring stands, you can make your own test tube holder. Figure 2 shows a schematic for a homemade test tube holder. The photos in Figure 3 show an example of a homemade test tube holder constructed out of PVC pipe and rubber bands.
- Fill all six jars with water so that they are nearly full. It may be helpful to use a measuring cup to make sure that each jar has exactly the same amount of water.
- Attach a vertical strip of masking tape to the side of each of your test tubes (for marking the water level).
- Using permanent marker, make a mark on the tape about 1 cm down from the mouth of the test tube. This will be the outside water level.
- Tear off enough steel wool to make a ball about 2.5 cm in diameter. Use a pencil to push the steel wool down to the bottom of a test tube. Repeat for a total of three test tubes with steel wool.
- Rinse all of the test tubes (three with steel wool and three without) by filling the test tubes with water, allowing the water to sit there for 1 minute, and then pouring the water out.
- This step will dampen the steel wool in the three tubes that have it thus making sure there is enough water present for the oxidation reaction.
- Treating the three test tubes without steel wool the same way ensures that all variables are controlled.
- Turn all six of the test tubes (three with steel wool and three without) upside down and mount them over the jars so that the water level is at the starting mark you made in step 3 on each test tube.
- You may want to cover your entire setup with a big plastic bag to minimize evaporation. Be careful not to knock the test tubes when covering and uncovering.
- Check at least daily, and write your observations down in your lab notebook. Carefully mark the water level on the tape on each test tube.
- When the water level is no longer changing in the test tubes, you're ready to analyze your results.
- Measure the difference in water level between the open end of the test tube and the water height inside the test tube at the end of the experiment. For how many tubes did the water level change? For those that did:
- Calculate the volume that corresponds to this difference. Use the formula for the volume of a cylinder, Equation 1, to estimate the volume.
Equation 1.
Volume of a cylinder = π × r² × h
- V is the volume in cubic centimeters (cm³)
- π is the constant pi
- r is the radius of the cylinder (cm)
- h is the height of the cylinder (cm)
- Calculate the volume that corresponds to this difference. Use the formula for the volume of a cylinder, Equation 1, to estimate the volume.
- Calculate the total starting volume of air in each test tube.
- Remember, for tubes containing steel wool, the wool will displace most of the air. Make sure your measurements and calculations take this in to account.
- Calculate the proportion of oxygen in each test tube.
- Calculate the total starting volume of air in each test tube.
- Average the proportion of oxygen from all the test tubes with steel wool. How does this compare with the value(s) for percentage of oxygen in the air that you found in your background research?
- What are the potential sources of error in your measurement?
Ask an Expert
Variations
- If you ever take a vacation in the mountains, you can use this method to compare oxygen levels in the air at high and low altitude. Try doing this experiment at high altitude and comparing the results with same experiment done at a lower altitude.
- Can you use this procedure to detect decreased oxygen content in exhaled air? Do background research and find out how much oxygen we consume when we breathe. Do you think this method is sensitive enough to detect the difference? Design an experiment to find out.
- What do you think would happen if you collected air samples at high altitude, and then tested them at low altitude (or vice versa)? How easily does oxygen dissolve in water? Could dissolved oxygen affect your results? Design an experiment to find out.
Careers
If you like this project, you might enjoy exploring these related careers: