How to Get Started Downloading and Using Storytelling Alice
Storytelling Alice (from Carnegie Mellon University) is an exciting 3-D computer programming environment that allows you to create your own animated stories and video games which you can share with your friends and family. While the words 3-D programming environment might sound a little intimidating, it really isn't! If you can use your mouse to drag and drop objects on the computer screen, you can create a computer program to animate characters on the screen. This help guide will walk you through how to download Storytelling Alice, as well as how to use many of the features you will need to create your own animations.
Downloading and Starting Storytelling Alice
- Go to the Carnegie Mellon University Storytelling Alice website to download Storytelling Alice. If you aren't using your own computer, make sure you have the computer owner's permission to download and install this program.
- The Storytelling Alice files are compressed (zipped) into a small file, so you must "unzip" the files so you can access them all. You should be able to right-click and find a command to unzip the files (such as "extract to..."). If you are unfamiliar with zipped files, have an adult help you with this step.
- Once the files are unzipped, click on the Alice icon. This launches the Storytelling Alice 3-D programming environment. You will get a pop-up that asks you to run Storytelling Alice. Click on the Run button.
- Be patient, you might have to wait about 10 seconds for Storytelling Alice to launch. Once it does, you'll see a green screen informing you that Carnegie Mellon University is giving you the gift of Storytelling Alice.
- Once the environment is launched, a Welcome to Alice panel will appear on the screen (see Figure 1). This panel gives you access to Recent Worlds, Templates, Examples, and Tutorials. Close this panel by hitting the Close button, located to the lower right. You will now see just the Storytelling Alice interface, shown in Figure 2.
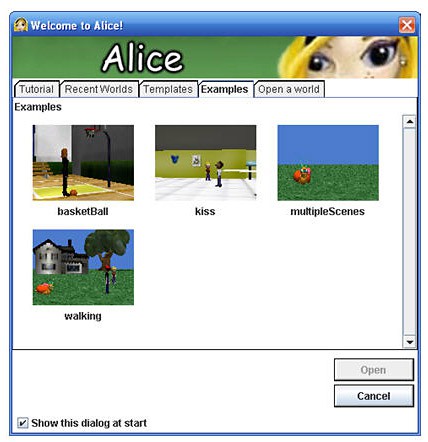 The welcome screen in Storytelling Alice includes four examples: basketball, kiss, multiple scenes and walking. Other available tabs are a tutorial, recent worlds, templates and open a world. |
| Figure 1. The Welcome to Alice introductory panel. |
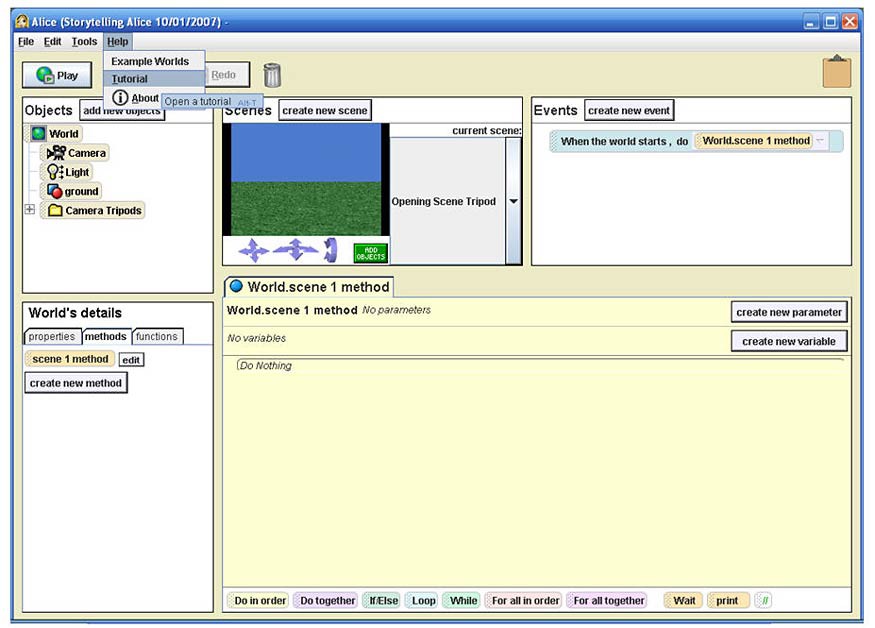 The program Storytelling Alice has options to build a scene where events can be programed upon opening the scene and details of the world can be changed. In the top navigation bar a tutorial is highlighted under the help tab. |
| Figure 2. The Storytelling Alice interface. |
Using and Getting Comfortable With Storytelling Alice
- There are five areas in the Storytelling Alice interface: Objects, Scenes, Events, World's details, and the editor area (shown as World.scene 1 method in Figure 3). See Figure 3 to look at the different areas. Table 1 below describes each area in more detail.
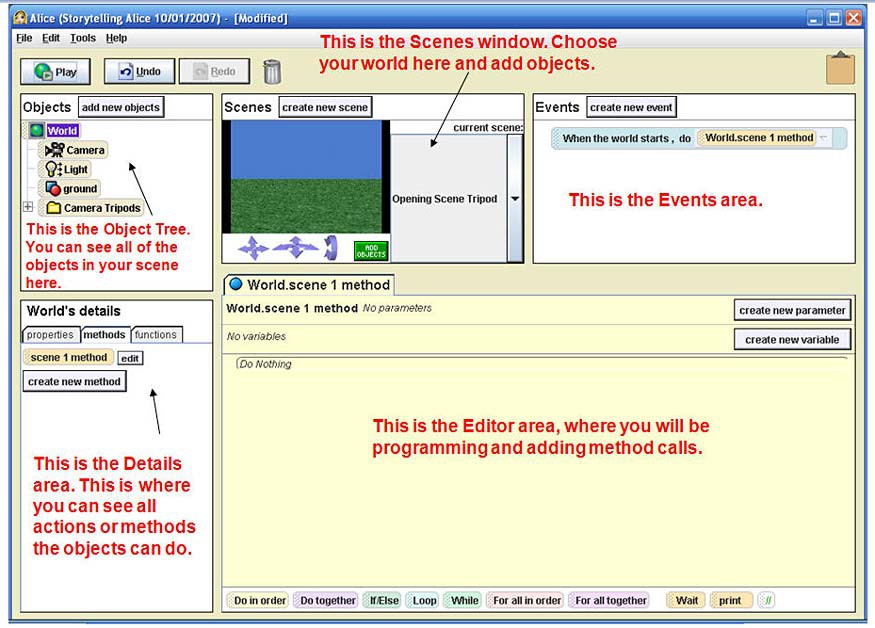 The scene building window in the program Storytelling Alice has options choose a world, add or remove objects, create events, add actions or methods to objects and an editing area where the program is compiled. The interface for programming events is a drag and drop method. |
| Figure 3. The five areas in the Storytelling Alice interface. |
| Areas in the Storytelling Alice Programming Environment | Available Actions in Each Area |
| Objects Area | Contains a list (also referred to as the Object Tree) of the character objects, scenery objects, and camera positions that are available in the scene that you can choose in the Scenes window. The tree starts with all of the objects in the world. You can click on an object from the world if you wish to get more details about that object. |
| Scenes Area | Shows the different scenes of the animation and your world. If your animation has several scenes, you can access all of the scenes from this area. By clicking on the green Add Objects button (not the "add new objects" button in the Objects area), you can add characters (also called objects) to your scene from an online gallery and manipulate their positions. |
| Events Area | Tells Storytelling Alice which part of your animation to execute (or run). It also allows events or actions to execute based upon user input, such as clicking the mouse on an object or character in your scene. |
| World's Details Area | Provides information about the various actions, or methods, that the characters and objects in the animation can perform. When you click on an object in the Object Tree, the actions or methods that object can perform are listed here. |
| Editor Area | Allows you to put together what you want to have happen in your animation or movie in Storytelling Alice. This is where you will add the instructions to create your animation. The name of the main tab in the editor area is "World.scene 1 method" and it is the main page where you will do your programming. |
- To learn more about these five areas, and to learn how to get started creating your animation, run all three of the tutorials that are available to you in Storytelling Alice. You should first go through the tutorials in order. But once you have gone through all three and as you want more information on a certain topic, you can pick the tutorial that you would like to review.
- To get to the tutorials, click on the Help menu, located at the upper left of the screen on the toolbar, as shown back in Figure 2. Then click on Tutorials. This will get you back to the Welcome to Alice panel shown in Figure 1, above.
- Click on the tutorial that you wish to view.
- Once you have finished the tutorials, try to make a quick and simple animation to get an idea of how Storytelling Alice functions.
- First choose the world in which your animation will be set.
- Go back to the Help menu on the toolbar and click on tutorials again. This will bring you back to the Welcome to Alice panel. Click on the Templates tab. You will see the panel shown in Figure 4. For a quick example, click on the dirt scene, then click Open. This scene will be the world in which this first simple animation will be set.
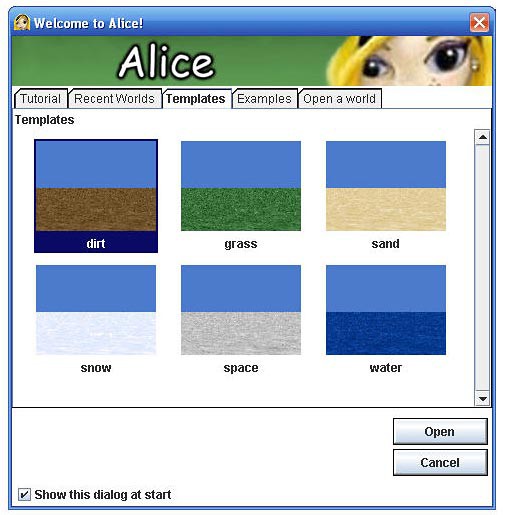 The templates tab in the program Storytelling Alice has six world templates to use that all have a blue sky in the background and different terrain (dirt, grass, sand, snow, space and water). Once a scene is selected they can be opened with an "open" button in the bottom right corner of the window. |
| Figure 4. Pick a scene from this panel. |
- Now you have an empty background for your animation. Time to add characters and scenery! Click on the green Add Objects button to add scenery objects and character objects to the dirt scene. You will have a choice of entering the character gallery and the scenes gallery. Click on the scenes gallery and look through the choices. In Figure 5, you can see mixed and matched scenery objects from the Egypt scene (Sphinx and pyramid) and from the City scene (buildings).
- The buttons to the right of the scene (which we'll call the Scene Window) allow you to manipulate the position of each of the scenery objects. For example, if you need to turn your character object around, then click on the third button from the left (the face with the arrow going around it) and then go back to the Scenes window and click and drag on the object until you have it positioned to your liking.
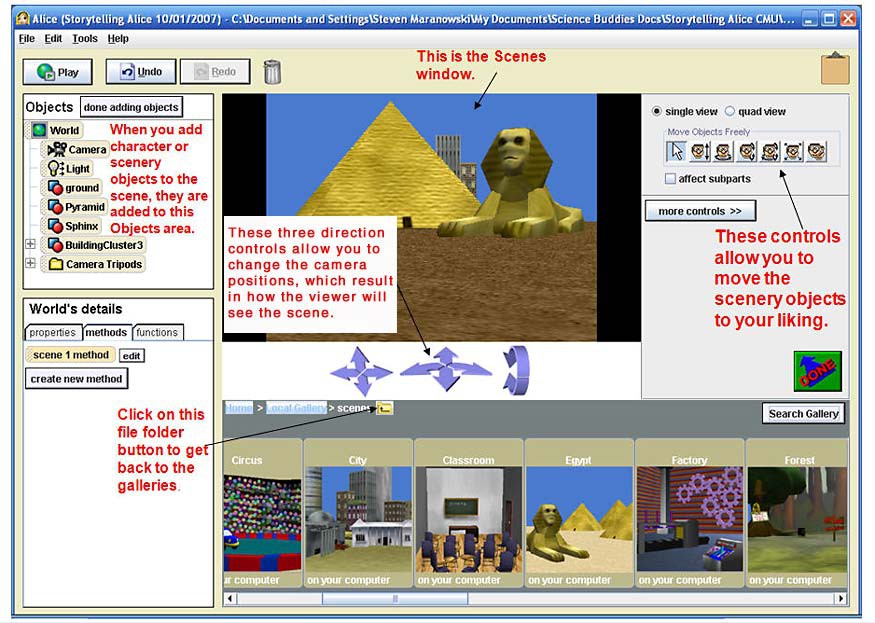 In the scene building window, objects can be added to the left sidebar and titled objects appear in the Scenes window. Under the scenes window, camera controls allow you to shift and rotate perspective in the scenes window. To the right of the scenes window are buttons to move objects around the scene. The file folder button above the screens gallery allows users to go back to the galleries folder to select a different scene to use. |
| Figure 5. The start of a new animation in Storytelling Alice. |
- Now it's time to add character objects to the scene. Go to the character gallery and choose the Big Bad Wolf from the Scary characters. The Big Bad Wolf will then drop into the scene. You can use the buttons to the right of the Scene Window to position him.
- Once you are done adding objects to the scene, go ahead and click the Done button located toward the right of the screen. This will get you back to the Storytelling Alice interface.
- You can go back and add objects to your world by clicking on the green Add Objects button at any time during the creation of your animation.
- Notice that all of the character objects and scenery objects in your world are listed in the Object Tree, located at the top left of the interface.
- Click on the Big Bad Wolf file in the Object Tree. Notice that a new list appears in the World's details area. This list describes all of the actions or methods that the Big Bad Wolf can perform or execute.
- Now go to the World's details area and click on the BigBadWolf say method, drag it to the editor area, and drop it. This line of instruction in the editor area is called a method call. Once you drop it into the editor area, you will be asked to choose what the Big Bad Wolf should say. You can choose from "Hello," "Goodbye," or something of your own choosing. You can also choose the font size, the font color, and the duration (length of time) the text will appear on the screen by clicking on the "more..." drop-down menu. Figure 6 depicts a Big Bad Wolf method call that is in place in the editor area, with two drop-down menus.

When a big bad wolf character is added to the scenes window in Storytelling Alice, the object file appears in the objects section in the top left corner of the window. Right clicking on a method in the editing area in the bottom right of the window allows more options to customize the scene (such as changing the text color of an object).
Figure 6. Dragging and dropping a Big Bad Wolf method.
- A method can be a single method or it can be a group of methods strung together that get an object to perform an action.
- A method call is when you direct a character to perform a method or action.
- To execute the method calls that are in the editor area, simply click on the Play button located at the top left, just below the toolbar. A separate window will open and executes the list of method calls from the editor area in order. Click on the Play button to see the Big Bad Wolf speaking the words that you wrote in the BigBadWolf say method. Close the window when the animation is complete and then go on to the next step.
- It isn't much fun to just have one method call, so explore the different methods for all of the character objects and scenery objects that are listed in the Object Tree. Add more method calls to the editor area to see how your objects act. As you drag and drop methods to the program, you will notice a green line in the editor area that denotes the location of where you are dropping the method. Use the line to make sure that the method is going in at the correct location. Figures 7 and 8 show the results of a slightly more complex list of method calls.
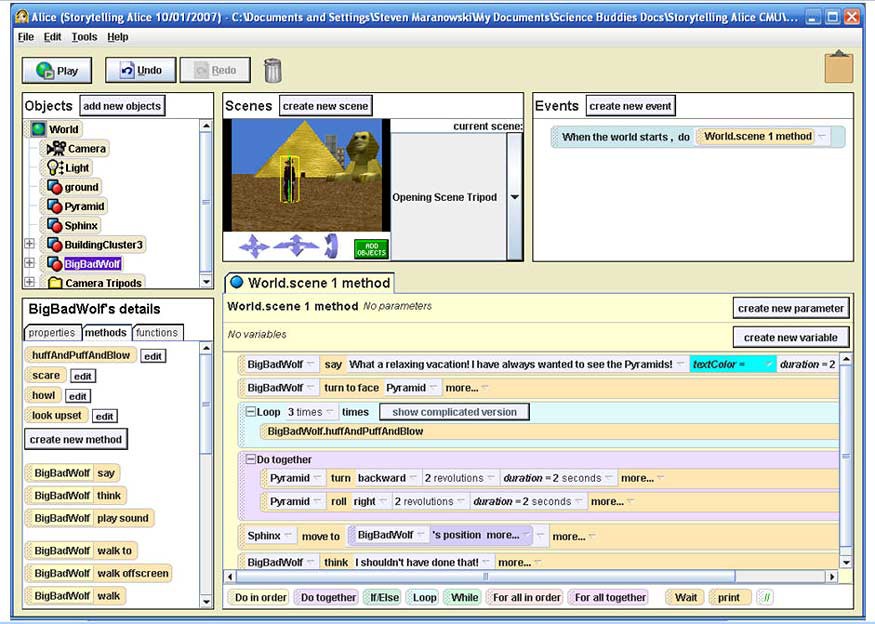
Methods can be added to animate objects (i.e. the Big Bad Wolf) in the Storytelling Alice program. Loops can be added to methods to allow characters and objects to repeat actions on screen. The example method shown has the big bad wolf say some dialogue before blowing at the pyramid. The pyramid then moves backward and rolls to the right. Finally, the Big Bad Wolf delivers more dialog.
Figure 7. A more complex list of methods is shown in the editor area.
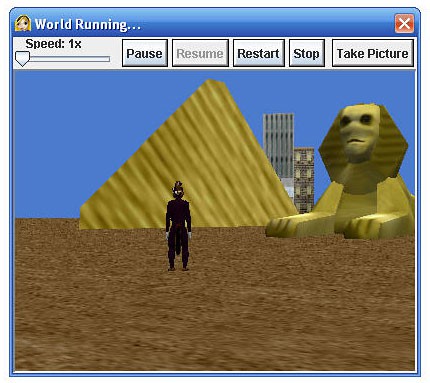
A screenshot of a big bad wolf scene shows the big bad wolf facing a pyramid that has been turned on its side. There are options in the window to pause, restart, stop and take a picture of the scene.
Figure 8. This pop-up window shows that the Big Bad Wolf huffed and puffed and the pyramid starts tumbling over!
- At this point, you have enough information to start on your own animation. The list of method calls shown in the editor area in Figure 8 show a Do Together construct and a Loop construct. You can access these constructs, as well as others, from the toolbar just below the editor area. Simply drag and drop them where you need them in the editor area. Table 2 below describes all of the available constructs.
Table 2. The available constructs in Storytelling Alice, described above, can help users program fun and interactive animated stories and video games.Construct Action Do In Order Executes a method call or a block of method calls in sequential order. This can be used to create complicated actions like blinking. Do Together Allows you to have Storytelling Alice perform two or more method calls at the same time. To learn more about the Do Together construct, refer back to tutorial #2 (with Trevor and the Ogre). If/Else Also known as a conditional statement. Using "If," if a certain condition is true (or false, depending on how you set up the construct), then Storytelling Alice will perform the method call(s) that you request. Using "Else," if the condition is false (or true, depending on how you set up the construct), then different method call(s) will be performed. You can choose to have no method call(s) listed in the Else part of the construct. Loop Allows you to have an object perform one or a list of method calls repeatedly for a specified number of times. In the example shown in Figure 7, the Big Bad Wolf object performs the huffandpuffandBlow method three times using the Loop construct. Refer to the first example, basketball, to learn more about loops. See step 20, below, to learn how to access the Storytelling Alice examples. While Keeps executing a method call or a block of method calls while a condition is true (or false depending on how the condition is written). For All in Order Goes sequentially through a list. Each item in the list, one after another, is asked to perform a method or a group of methods. For All Together Goes sequentially through a list. Each item in the list are asked to all together perform a method or a block of methods. Wait Stops execution of the program for a specified amount of time. Print Prints a line of text to the screen. Comments Allows the programmer to fully describe the program he or she has just finished writing. To 'comment' your program, simply drag the button with the two forward falling slashes to the location where you wish to add text. Commenting your program is a very good practice because it describes to the reader what each part of your program does.
- If you would like your character objects or scenery objects to perform a method that does not exist, then you can create it yourself in Storytelling Alice. First, go to the Object Tree and click on the object that you want to give a new method. That object's details will pop up in the World's details area. Click on the create new method button under the object's World's details area. This will open up a new tab in the editor area where you can mix and match methods to create the new method that you want. The name that you give the method will be the name of the tab in the editor area. This allows you to easily keep track of the different methods you create. To learn more about creating different methods, refer back to tutorial #2 (with Trevor and the Ogre).
- To learn how to do more complicated actions (create more complicated methods), refer to the four Storytelling Alice examples. Click on the Help menu on the toolbar and choose Examples. Here you will find out how to make new methods for objects and how to create and call for different scenes in your animation. You can also download this Big Bad Wolf example.
- Once you have gone through the examples you're ready to start creating any animation you can think of.
- If you're looking for a science project which uses Storytelling Alice to make an animated story try Storytelling Alice: Once Upon a Time in a Computer-generated Land....
Additional Animation and Game Making Resources
Storytelling Alice is just one of the free programming environments available to make animated stories and games. If you're interested in learning about others see our table of Kid-Friendly Programming Environments.