Waves in Slow Motion
Summary
Introduction
Have you ever noticed seagulls bobbing up and down on the ocean while surfers paddle forward to catch a wave? Maybe you remember floating on a lake, going up and down as a wave passed by, or the feeling of being swept ashore by a breaking wave. Water waves are fascinating. They come in all sizes, from a tiny ripple to monster waves that are ten meters high. You have seen them, but do you know what drives them, how they move across oceans and seas?
In this activity, you will bring the ocean home and make waves in a bottle. Sharpen your observation skills and find out why some waves are slow and others are fast.
Background
Wind causes most of the waves on seas and oceans. This is how it works. Wind causes water to pile up above the undisturbed water level. The water under the crest (or peak) of the wave feels the extra water pushing down on it. The extra weight then pushes water out from under the peak of the wave. The moving water overshoots and creates a peak in a new place, and so the wave moves on.
Oceans and seas are layers of water under a layer of air, the atmosphere. Because air is much less dense than water (it weighs about one thousand times less than the same quantity of water), the air has little influence on the wave. So in order to understand how waves work, you will add a layer of oil on top of the water. Oil is less dense than water, but denser than air. Curious about how this affects the wave on the water surface?
Materials
- Two similar, clean, transparent bottles with caps. Two litter soda bottles work well.
- Vegetable oil, enough to fill one bottle two thirds full
- Water
- Food coloring (blue is a good choice)
- Towel
- Pen and paper
- Optional: Funnel for easier filling of the bottles
- Optional: Two small pieces of wax; pieces cut off of a candle work well.
Preparation
Warning: You might spill water or oil while preparing your bottles. Choose your work space accordingly.
- Choose a work space such that a little spilled water or oil can easily be cleaned up.
- Place a towel on your work area. Performing the following actions over the towel will make cleanup easy and quick.
- Fill both bottles about one third full of water. A funnel can help you pour water into the bottles. Add a few drops of food coloring.
- Close one bottle and set it aside.
- Gently fill the other bottle up with vegetable oil. Here again, a funnel can prevent spills.
- Close the bottle and set it aside.
- Check that both lids are screwed on well.
- Move the prepared bottles carefully to the area where you will make observations.
- Let the bottles rest on their sides until you are ready to make observations.
Instructions
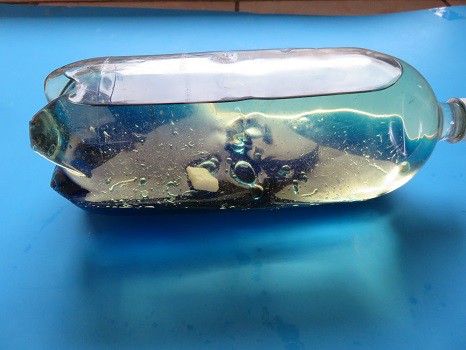
- What can you see in the bottle containing water and oil? Is the water floating on top of the oil, the oil on top of the water or are both liquids mixed? Which one do you think is denser, the oil or the water?
- What do you think is on top of the water in the bottle containing only colored water? Is there anything, or is it empty space?
- Start with the bottle containing only water. Hold this bottle horizontally and lift one end to cause a wave. Once the wave has started, bring your bottle back to a horizontal position and observe the wave. Repeat with the bottle containing oil and water. Do you notice a difference in the waves produced? Are the waves in one bottle faster than in the other? Are they higher?
- To make comparison easier, count each time the wave bounces back on the cap or bottom side of the bottle. Start with the bottle containing only water. Hold the bottle horizontally and lift one side to create the wave. Bring your bottle back to the horizontal position and keep count as the wave reaches the other side of the bottle. Add a number each time the wave reaches the cap or the bottom side of the bottle. Do this until the wave has died out.
- Repeat the previous step with the other bottle. Did you notice a difference? Did you need to count more slowly for one bottle than the other? What does that indicate and why could that be? The extra activity below might give you a clue.
Extra: Open the bottles, put a little piece of wax inside both bottles and close them again. Because wax is denser than oil, but less dense than water, it will float on water but sink in oil. You might need to wait a little while for the wax to sink through the oil until it reaches its place on top of the water. Think of the wax as a seagull, a boat or a surfer floating on top of the water. Create a wave like you did before, but now, watch how the wax moves. Does it move back and forth or rather, up and down with the wave? Can you explain your observations?
Extra: If you have a stopwatch, you can measure the period of the wave. The period is the time it takes for one wave to pass by, from crest to trough and back to crest. Looking back at the observations you made earlier, do you think the period is the same for waves with air on top and waves with oil on top? Use your stopwatch to time how long it takes for your wax object to start at the top of a crest, go down into a trough and back up to the top of a crest. This time measured is exactly the period of the wave. Is the period the same for waves with air on top and waves with oil on top?
Extra: The frequency of a wave is how many waves pass by in a second. Looking back at the observations you made earlier, do you think the frequency is the same for waves with air on top and waves with oil on top? Can you find a way to measure or calculate the frequency of the waves you created?
Observations and Results
Did you notice that water with oil on top produces surprisingly slow waves?
A wave moves because the extra weight of the liquid in the wave's peak pushes water from under the peak to places where the water is shallower. This happens in both bottles.
For the bottle with water and air, both the water and the air push on the deeper layers of water. Air is about one thousand times less dense than water, so when a wave passes by, deeper layers of water mainly feel the weight of all the water piled up in the wave. The difference in weight felt under the crest and under the trough (or lowest point) is the wave’s driving force. In this scenario, the big difference in weight results in a fast-moving wave.
Similarly, for the bottle with water and oil, water and oil push on the deeper layers of water. Just like air, oil is less dense than water (about two thirds as dense), so an amount of oil weighs less than the same amount of water. Thus, as water piles up in a wave, more water and less oil will weigh down on a spot underneath the wave peak. At the shallowest point of a wave, however, more oil and less water weighs down on the water below. As a result, the difference in weight of the liquids at a point under the crest and a point under the trough (or lowest point of the wave), is much smaller in this scenario, so the driving force of the wave is much smaller. It still forces water to move from underneath the wave peak. In addition, the water and the heavier-than-air oil both have to be moved, so the liquids flow much more slowly than when air flows on top of water. What you observe is a wave on the water surface that travels much more slowly.
In the extra activity, you probably observed that the wax mainly moved up and down while the wave moved forward and backward. This is because in a wave, it is the water underneath the wave that moves horizontally; the water on the surface moves up and down.
Ask an Expert
Cleanup
- You can pour the contents of the bottle with only colored water down the drain, but do not pour oil down the drain!
- Set your bottle with water and oil upright and give the liquids some time to separate. Select a container or bottle (like the one you used for colored water) to collect your oil in. Gently pour the layer of oil to a clean container or bottle. It is ok if some water flows over as well, just do your best to transfer most of the oil. Use a funnel if available. Close the container or bottle with oil and pour the remaining colored water down the drain. Search online for a for a place to donate your used cooking oil. Used cooking oil can be turned into biodiesel, a non-toxic and biodegradable fuel that can power cars and buses and produces fewer air pollutants than petroleum-based diesel.
- One other option is to compost your vegetable oil. If throwing it away is your only option, throw your closed container in the trash.
Additional Resources
- Seawater Science: Model Ocean Currents in Your Kitchen, from Scientific American
- Slow Waves, from The Naked Scientists