Electric Play Dough
Summary
This lesson plan was inspired by the Squishy Circuits project, developed by Dr. AnnMarie Thomas at the University of St. Thomas.
Overview
If you love doing arts and crafts with your students, this lesson plan is for you! Teach them about energy, electricity, and circuits as they build light-up sculptures, using something they are all familiar with—play dough! Clear step-by-step instructions are provided and no previous experience with circuits is required.Learning Objectives
- Understand the difference between conducting and insulating materials
- Demonstrate how to build a closed circuit while avoiding short or open circuits
- Understand how a circuit can convert electrical energy into light energy
NGSS Alignment
This lesson helps students prepare for these Next Generation Science Standards Performance Expectations:- 4-PS3-2. Make observations to provide evidence that energy can be transferred from place to place by sound, light, heat, and electric currents.
|
Science & Engineering Practices
Planning and Carrying Out Investigations. Make observations to produce data to serve as the basis for evidence for an explanation of a phenomenon or test a design solution.
|
Disciplinary Core Ideas
PS3.A: Definitions of Energy. Energy can be moved from place to place by moving objects or through sound, light, or electric currents.
PS3.B: Conservation of Energy and Energy Transfer. Energy can also be transferred from place to place by electric currents, which can then be used locally to produce motion, sound, heat, or light. The currents may have been produced to begin with by transforming the energy of motion into electrical energy. |
Crosscutting Concepts
Energy and Matter. Energy can be transferred in various ways and between objects.
|
Materials
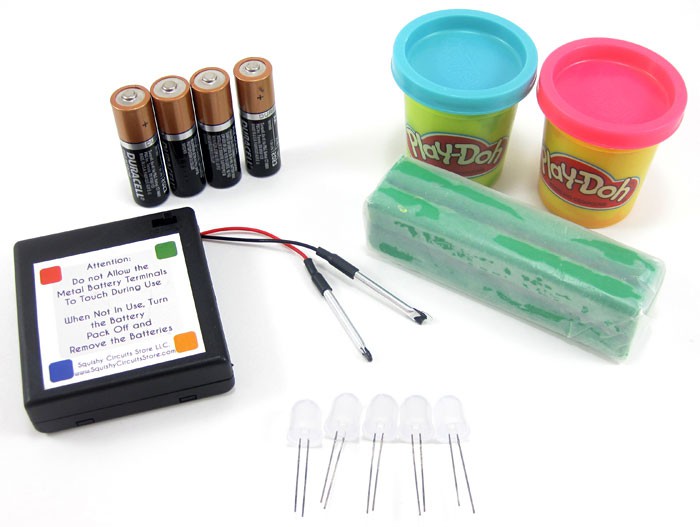 Image Credit: Ben Finio, Science Buddies / Science Buddies
For each group of students you will need:
- Electric Play Dough Kit, available from our partner
Home Science Tools.
You will need these items from the kit:
- 4xAA battery holder
- Piezoelectric buzzer
- Jumbo LEDs (25 total — 5 each in red, green, white, yellow, and blue)
- White insulating dough (3.5 oz)
- Red, blue, and green conductive dough (3.5 oz each)
- You will also need to gather these items, not included in the kit:
- AA batteries
Optional: in addition to the dough included in the kit, you can make your own conductive and insulating dough (for example, if you want other colors). See Electric Play Dough Recipes for materials and directions for making your own dough. You can also use store-bought Play-Doh® (replaces conductive dough) and modeling clay (replaces insulating dough).p
Background Information for Teachers
This section contains a quick review for teachers of the science and concepts covered in this lesson.We use battery-powered devices like cell phones every day. Batteries store electrical energy and allow us to make electronic devices portable, so they do not have to be plugged into a wall outlet all the time. Batteries can be connected to other electronic components to form a circuit. Circuits allow electricity from batteries to be converted to other forms of energy like light (a flashlight), sound (a speaker), and motion (a motor).
In this project, your students will build circuits with tiny lights called LEDs (which stands for light-emitting diode), as shown in Figure 1. The little blinking lights you see on many electronic devices like computers, TVs, and internet modems are LEDs. In this circuit, the electrical energy from the battery is converted to light energy from the LED.
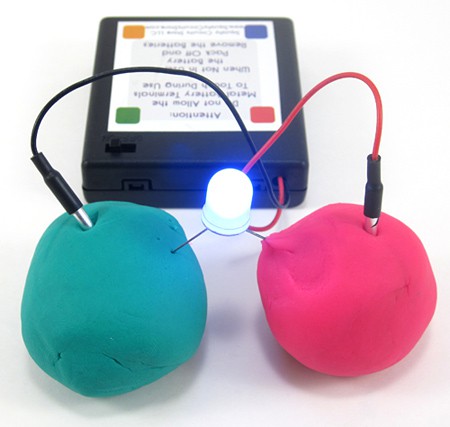 Image Credit: Ben Finio, Science Buddies / Science Buddies
Figure 1. Circuit with a battery pack, play dough, and an LED.
Circuits are made up of conductors, or materials that let electricity flow through them easily. Most metals are good conductors. You are protected from electric shocks when you touch an appliance by insulators, or materials that prevent electricity from flowing through them. Most plastics and rubbers are good insulators. Most circuits are made of wires, which have a metal core surrounded by plastic insulation. This allows us to touch the wires safely without getting shocked. In this project you will use conductive and insulating dough instead. This allows you to teach your students about circuits using art supplies instead of wires!
Electricity needs a complete path, or loop, to flow. In order to successfully build a circuit, you need to know the difference between open, closed, and short circuits (Figure 2).
- In an open circuit, part of the circuit is disconnected, so the loop is broken and the LED will not light up.
- In a closed circuit, there is a complete path for electricity to flow through the LED, so the LED will light up.
- In a short circuit, there is a "shortcut" between the battery pack wires, so electricity can skip past the LED and it will not light up.
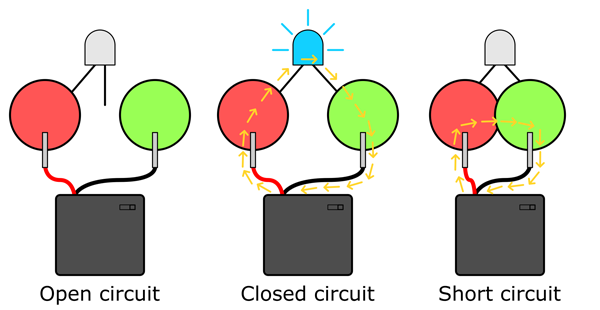 Image Credit: Ben Finio, Science Buddies / Science Buddies
Figure 2. From left to right: open, closed, and short circuits. Yellow arrows represent the flow of electricity.
One way to prevent short circuits is to use insulating dough or modeling clay, as shown in Figure 3. The insulating dough prevents the two balls of conductive dough from touching each other, thus preventing a short circuit.
 Image Credit: Ben Finio, Science Buddies / Science Buddies
Figure 3. Circuit with insulating dough (yellow) used to prevent a short circuit between the two lumps of conductive dough (red and green).
In this lesson plan, you will walk your class through the concepts described above and then let them create their own light-up sculptures.