Abstract
In this engineering challenge, you will build a car powered by nothing but a rubber band. The farther the car goes, and the fewer materials you use to build it, the higher your score. Enter your score in the 2024 Science Buddies Engineering Challenge for a chance to win prizes! Teachers, lesson plan versions of this challenge are also available.Summary

Objective
Build a rubber band-powered car that goes as far as possible.
Introduction
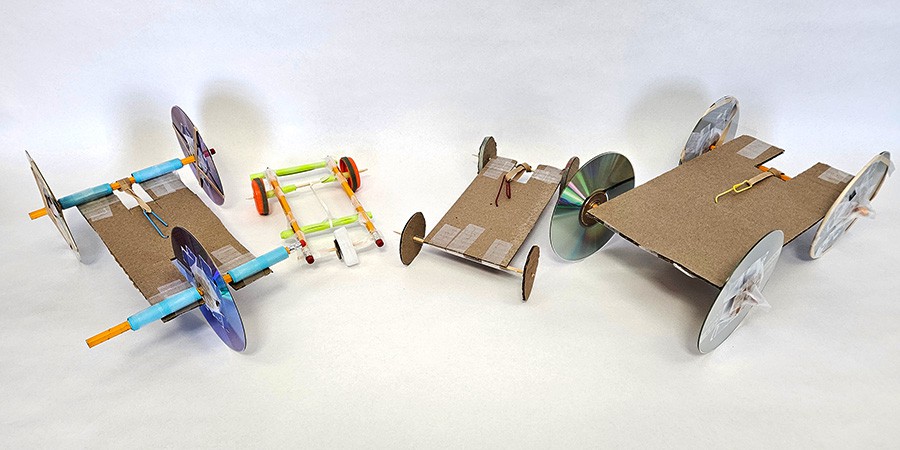
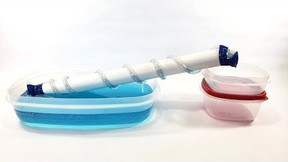
Rubber band-powered cars, like the ones in Figure 1, can be made from a variety of materials, but they all have one thing in common. A rubber band is wound around an axle, a cylindrical rod that passes through the centers of the wheels. As you twist the axle and tighten the rubber band, it stretches and stores elastic potential energy. When you release the axle, the rubber band contracts, and this potential energy is converted to kinetic energy, the energy of motion, and the wheels will spin. Depending on the amount of friction with the ground, the wheels might propel the car forward, or they might just spin in place! The frictional force between the wheels and the ground depends on both the weight of the car and the coefficient of friction, which depends on the materials the wheels and ground are made of. That is a lot of physics in one little device!
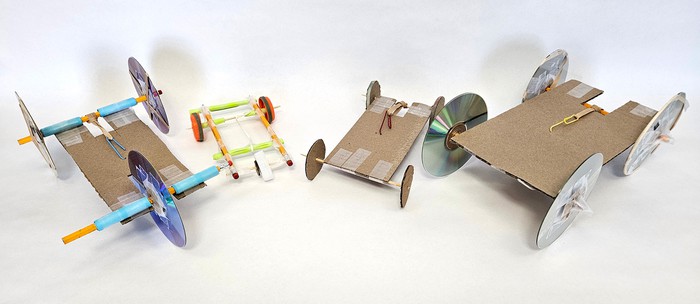 Image Credit: Ben Finio, Science Buddies / Science Buddies
Figure 1. Four different rubber band car designs made from different materials.
Do not worry if you have not taken a physics class yet and are not familiar with all the terms mentioned above. This project is still a great hands-on building opportunity to practice the engineering design process. You should put some effort into brainstorming and designing your car before you dive in and start building it. However, it is difficult to predict exactly how well your car will work, and engineers rarely get things right on the first try! You will probably need to test, redesign, and re-test your car multiple times to improve its performance. This process is called iteration. You do not have to worry if your car does not work well at first, because you can re-test it as many times as you want before you ultimately submit your highest score for the challenge.
Terms and Concepts
- Axle
- Elastic potential energy
- Kinetic energy
- Wheels
- Friction
- Force
- Weight
- Coefficient of friction
- Engineering design process
- Iteration
Questions
- How does a rubber band car work?
- How is energy converted from one form to another in a rubber band car?
- What are the different parts of a rubber band car?
- What materials could you use for the different parts?
Bibliography
- Science Buddies staff (n.d.). The Engineering Design Process. Retrieved December 7, 2023.
Materials and Equipment
To be eligible to enter your score in the 2024 Science Buddies Engineering Challenge, you can only use the following materials to build your car. Each material costs a certain number of points. See Procedure section for details on calculating your score.
| Material | Size/type restrictions | Maximum quantity | Points (each) |
|---|---|---|---|
| CDs or DVDs | n/a | 4 | 2 |
| Plastic bottle caps | Any size. No metal lids. | 4 | 2 |
| Paper | Printer, construction, graph, or notebook paper (letter, A4 size, 9"x12", or 22x30 cm sizes are all allowed) | 10 sheets | 1 |
| Wooden pencils | n/a | 10 | 1 |
| Plastic or plant-based/biodegradable drinking straws | Any size. No metal straws. | 10 | 1 |
| Wooden skewers | n/a | 10 | 1 |
| Paper clips | Maximum length 1-3/4" or 45 mm | 10 | 1 |
| Sheets of cardboard | Maximum 12×12 inches or 30×30 cm | 2 | 10 |
| Rubber bands | Maximum size #64 (3-1/2×1/4 inches or 90×6 mm when laid flat and unstretched) | 10 | 2 |
| Tape | Maximum 1 inch (2.5 cm) wide. Clear office tape, masking tape, or painter's tape. Duct tape, packing tape, and electrical tape are not allowed. |
1 roll | 5 |
You can use the following tools for building and testing your car (they cannot be used as part of the car):
- Scissors
- Hobby or Xacto knife
- Ruler
- Pencil or pen (for drawing lines for cutting, does not count toward material cost if not used as part of the car)
- Tape measure
- Optional: drill and drill bits (useful for drilling round holes in bottle caps)
- Optional: file or sandpaper (useful for smoothing rough edges of drilled holes)
- Optional: markers or crayons for decorating your car (cannot be used as parts of the car)
Experimental Procedure
The objective of the 2024 Science Buddies Engineering Challenge is to build a rubber band-powered car that goes as far as possible. If you have not already done so, please watch the introductory video for an overview of the challenge before you proceed. To enter the challenge, you must follow these rules:
Rules
- You must build a vehicle with a frame, at least one axle, and at least one wheel.
- The car must be a single device. No parts of the car can intentionally or unintentionally detach, fall off, or otherwise separate during the test.
- The car must be powered entirely by one or more rubber bands. No other sources of forward force or movement, such as pushing or blowing on the car, are allowed.
- All rubber bands that power the car must be pulled/twisted/tightened, etc. by hand by up to two people. No additional external tools or sources of leverage that are not part of the car (wrenches, power drills, etc.) are allowed to help tighten the rubber band.
- The test must be conducted on a flat surface. Any surface (carpet, wood, concrete, etc.) is acceptable.
- A straight start line must be marked on the floor, using any material that will not create a bump or impede the car's motion (tape, chalk, etc.). The car must start completely behind the start line.
- After the car has been released, no one can touch the car, and it cannot touch or bump into any objects, until it comes to a complete stop on its own.
- After the car has come to a complete stop, distance is measured from the point on the start line directly in front of where the car started to the closest point on the car (Figure 2).
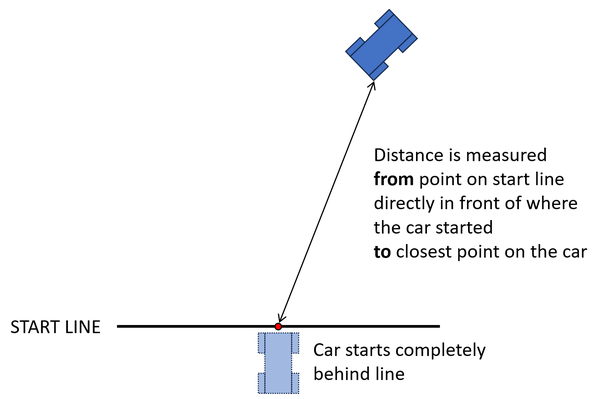 Image Credit: Ben Finio, Science Buddies / Science Buddies
Figure 2. Diagram for testing and measuring the distance of your car.
Design
Before you start building anything, it is a good idea to brainstorm different designs. If you need help getting started, look at the cars in Figure 1 and closely re-watch the introduction video. Try sketching your designs out on paper (paper used for sketching does not count toward the total used to build your device). Remember that there is a potential trade-off in your design. You might be able to build a better, sturdier car that goes farther using more materials, but each material costs a certain number of points. Your score depends on both how far your car goes and how many materials you use to build it. Can you figure out how to make good use of materials and efficiently build a car that goes as far as possible?
Build
Once you have a design, it is time to start building. You might want to build in stages, testing different parts of your car one at a time. For example, you might want to first make sure the axles spin smoothly when you spin them by hand. Next, you can put your car on the ground and see if it rolls when you push it. Finally, you can wind up the rubber band and see if it will propel the car forward when you let go. You might find that your design does not work out as planned once you start building, and that is OK! You can go back and change parts or even all of your design.
Test
Once you have finished building your car, you should test it on a flat surface free from obstacles. Wind up the rubber band, place your car on the ground, release it, and watch it go. Watch your car carefully. What happens? Do the wheels grip the ground, or do they spin too fast and slip? Do the axles spin smoothly, or does the car's motion look bumpy? Does it go straight or curve off to one side? Think about ways you can improve your car's performance and make it go farther. You can also think about ways you can remove materials or start over and build a new car with fewer materials (only materials used in your final design count when calculating your score). Iterate through the design, build, and test process until you are ready for an official test.
Official Test
When you are ready for an official test, make sure you have a start line marked on the floor. Mark a point on the start line using a marker or a piece of tape. Wind up the rubber band (up to two people can do this—it may be easier if one person holds the car while another person twists the axle), place the car on the floor completely behind the start line, centered directly behind the point you marked, and let it go. Watch the car and make sure it does not bump into anything and that no one touches it until it comes to a complete stop on its own. Once the car has stopped, use a tape measure to measure the distance from the point on the start line to the closest point on the car (see Figure 2). Write this distance down. If at any point during the test you break one of the rules, you must start the test over.
Scoring
Your score is calculated using this equation:
Equation 1:
A scoring worksheet and scoring spreadsheet are available to help you calculate your score. You can also read the following written instructions or watch the video with an example calculation.

- If you measured your distance in inches, convert it to centimeters by multiplying by 2.54. For example, if your car traveled 10 inches, that is 10×2.54 = 25.4 cm.
- Count the total number of each material item that you used. Material quantities are not prorated. For example, even if you only use one quarter of a 12×12 inch sheet of cardboard, you must count the entire sheet (so you would enter "1" for the quantity in the scoring worksheet, not "1/4" or "0.25."). If you use any tape at all, you must enter "1" for tape.
- For each material, multiply the quantity by the point cost for that material to calculate the subtotal for that material. For example, if you used 4 CDs, which are worth 2 points each, that is 4×2=8 points.
- Add up all of the subtotals to get your total material points cost. For example, a car that used all of the following materials would have a total point cost of 31.
- 4 CDs (4×2 points each = 8 points)
- 1 sheet of cardboard (1×10 points each = 10 points)
- 2 pencils (2×1 point each = 2 points)
- 2 straws (2×1 point each = 2 points)
- 1 sheet of paper (1×1 point each = 1 point)
- 1 rubber band (1×2 points each = 2 points)
- 1 paper clip (1×1 point each = 1 point)
- 1 roll of tape (1×5 points = 5 points)
- Plug your distance in centimeters and total material points cost into Equation 1 to calculate your score. For the car in the example above, with a distance of 25.4 cm and a material points cost of 31, the score is (2×25.4)-31 = 19.8.
- Round your final score to the nearest whole number. The score of 19.8 would round up to 20. If the score was 19.49, that would round down to a final score of 19. The score submission form will not accept decimals.
Submitting Your Score
See the 2024 Science Buddies Engineering Challenge page for instructions on how to submit your score and prize details.
Troubleshooting
For troubleshooting tips, please read our FAQ: Rubber Band Car Challenge.